
I can start with the arrow weight that gives my bow the best performance, then lower it because the trajectory falls outside my four-inch shot window. I can add a fourth vane to help control a large fixed-blade, single-bevel broadhead and pull FOC back under 20 percent. By the time I am done, the best arrow weight may not be the number I started with.
That is why I do not give every hunter one grain number. The right weight has to work with your bow, your normal shot distance, your broadhead, your components, and the arrow flight you can prove.
The Everyday Arrow Weight Formula gives me the starting target. The rest of the Everyday Arrow System tells me whether that target survives the build. This guide shows how I make that final decision.
What Finished Arrow Weight Includes
Finished arrow weight means the complete arrow exactly as it will be shot. Start with shaft GPI multiplied by the cut shaft length. Then add the insert, outsert, half-out, collar, field point or broadhead, nock, bushing, vanes or feathers, wrap, lighted nock, weight screws, and every other attached part. If it stays on the arrow when you shoot, count it.
Do not confuse shaft GPI with total arrow weight. A shaft marked 8.5 GPI weighs 8.5 grains for every inch of shaft—not 8.5 grains for the whole arrow. Follow the bow and arrow manufacturers’ minimum-weight and component requirements first. The goal here is to choose a practical target above that safe floor.
Why Your Bow Setup Matters
Draw weight gives the Formula its starting load. Bow speed and draw length help show how much performance is available. Typical distance tells us how much trajectory must be preserved.
Two hunters can both shoot 60 pounds and still need different starting targets because their bows, draw lengths, and normal distances are different.
My 1,008-setup arrow-speed study shows why the best finished weight depends on the bow and normal hunting distance—not one universal fps target.
The Real Tradeoff: Mass and Usable Trajectory
From the same bow, added arrow mass normally reduces launch speed. The slower arrow will have a more curved path and will punish distance-estimation errors more at longer range. The question is not whether drop exists. Every arrow drops. The question is whether the path stays practical for the distances you actually shoot.
Flight time belongs in that decision too. If added weight slows the arrow enough, the deer has more time to lower, turn, or step after it hears the shot. That does not make a lighter arrow automatically better or create one minimum speed for every bow. It means the upper edge of a useful weight range must preserve both a practical trajectory and enough reaction-time margin for the hunter’s verified distance. See Best Arrow Speed for Hunting for the full explanation.
At the same time, added mass often increases momentum and can change how the bow transfers energy. KE may increase, decrease, or stay close. That is why the best comparison uses the whole output instead of one number.
Worked Formula Example
Consider a 340 IBO bow set to 62 pounds with a 27.5-inch draw and a typical distance of 40 yards. Formula V2.1 produces a 469-grain target and a 444–494-grain Working Range.
| Weight | Estimated speed | Launch KE | Launch momentum | Job inside the Working Range |
|---|---|---|---|---|
| 444 gr | 260.1 fps | 66.71 ft-lb | 0.513 slug-ft/s | Trajectory Focused |
| 469 gr | 254.0 fps | 67.20 ft-lb | 0.529 slug-ft/s | All-Around Hunting Balance |
| 494 gr | 249.3 fps | 68.19 ft-lb | 0.547 slug-ft/s | Mass and Momentum Focused |
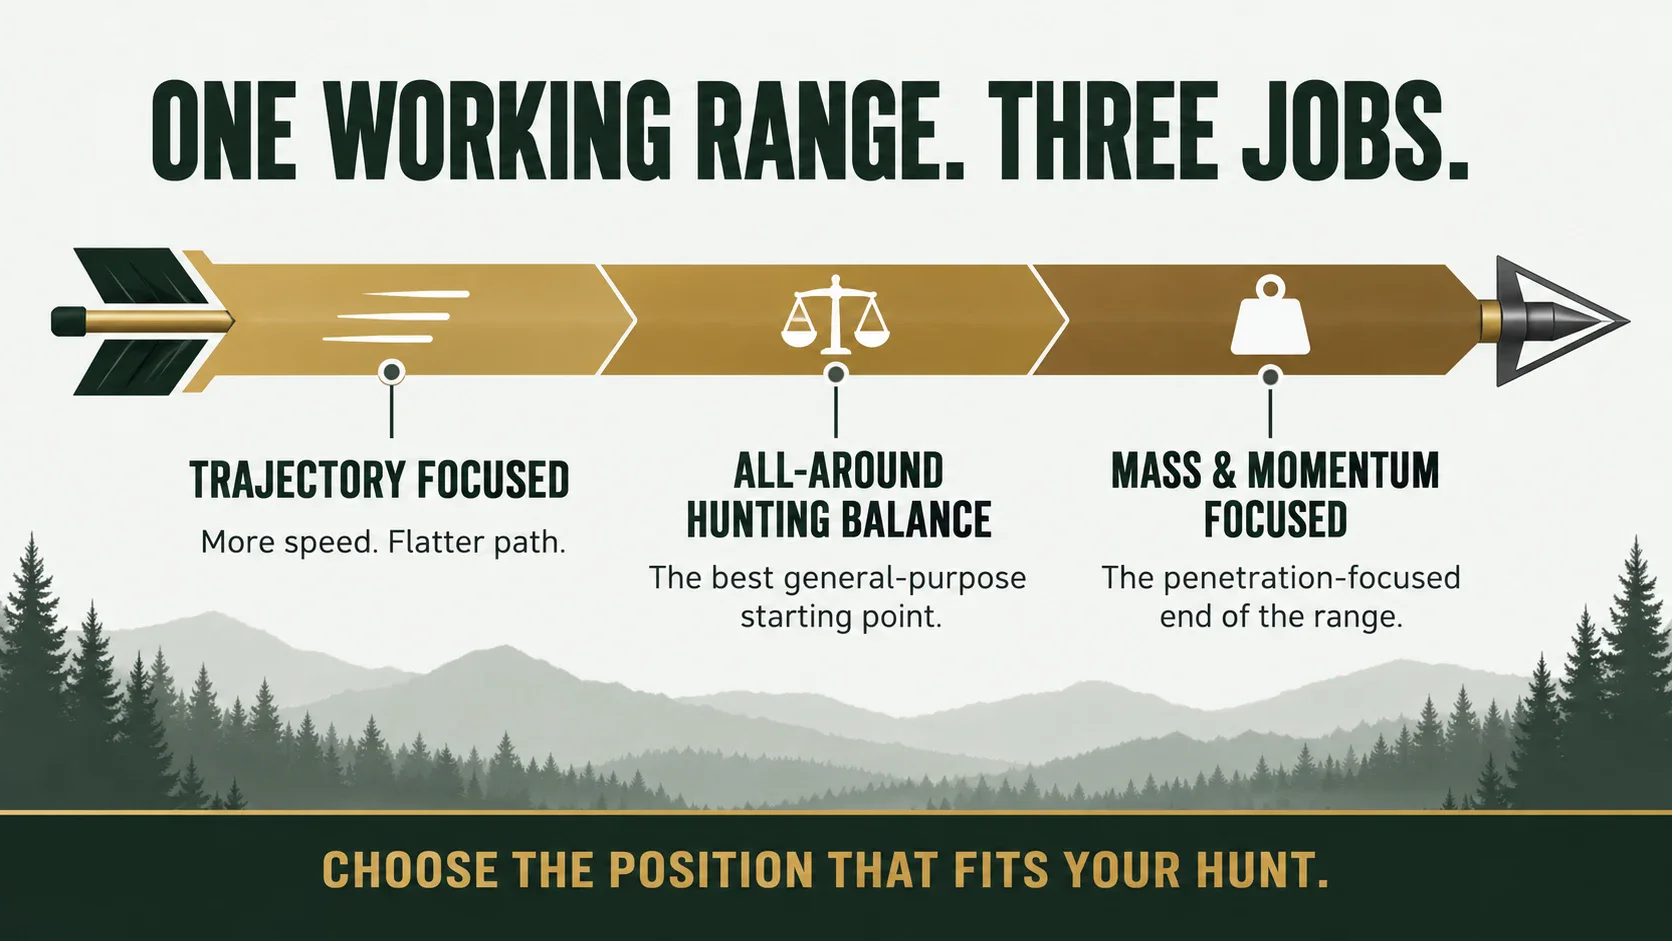
These are planning estimates from the Arrow Performance Calculator. They are useful for comparing arrow weights from the same bow. A chronograph can replace the estimated launch speed with the actual speed after the test arrow is built.
The Formula gives this bow a 469-grain starting target. That does not make 469 the only arrow that can work. The 444-grain end keeps more speed and a flatter path, but it carries less mass and momentum and gives up penetration capability. The 494-grain end carries more mass and momentum and has better penetration capability, but it gives up speed and trajectory margin. The shaft, components, broadhead, and verified trajectory tell me where inside that range the finished arrow should land.
Wherever the finished weight lands, the arrow still has to pass the arrow-length, spine, FOC, clearance, and tuning checks.
How I Make the Final Weight Decision
The Formula target is where I start, not where I stop. Say a base build gives me the performance I want, but the Trajectory Calculator shows it falling outside my plus-or-minus four-inch shooting window at 30 yards with a 25-yard zero. I can take some weight out and run the comparison again. That is a useful change because it solves a real problem in my shot window.
Now say that lighter build puts FOC over 20 percent and I am shooting a large fixed-blade, single-bevel broadhead. I may add a fourth vane. The added rear weight can pull FOC back while the extra steering helps control that broadhead. That change also affects finished weight and dynamic spine, so I run those checks again.
This is what choosing arrow weight really looks like. The bow supplies the launch, but the arrow and broadhead still have to do the work when they reach the animal. I am not chasing a perfectly balanced number. I am changing one part at a time until the arrow gives me the best opportunity for penetration and a clean shot, with the fewest problems for my bow and the way I hunt.
When a Lighter Build Makes Sense
- Your normal shots are longer and trajectory is a higher priority.
- Your draw length or bow output gives you less speed to work with.
- The lighter build stays above the bow maker’s minimum and tunes cleanly.
- The complete arrow remains structurally sound and matches the planned broadhead.
When a Heavier Build Makes Sense
- Your normal shots are short enough that the added drop is manageable.
- Your bow and draw length preserve useful speed with the added mass.
- The component combination solves FOC and dynamic spine without forcing compromises.
- The finished arrow shoots, tunes, and groups better in your setup.
Neither list means light or heavy is automatically right. It means the build has to be judged against the bow and the way it will be used.
Set Arrow Length and Preliminary Spine Before Final Components
Safe arrow length comes before the final component list. Arrow length is not simply draw length plus a fixed number. Rest position, riser shape, broadhead length, broadhead clearance, and the shaft maker’s instructions all matter. Measure shaft length from the throat of the nock to the end of the shaft. If you are unsure, have a qualified bow shop confirm the safe cut length before the shaft is cut.
Use the Dynamic Spine Calculator to find the continuous Required Spine for the bow, shaft length, and total front-component weight. Then map that requirement to the spine sizes sold for the exact shaft family and confirm the choice against the manufacturer’s current guidance. The Arrow Length Guide explains the measurement and clearance decisions in more detail.
Weight, FOC, and Spine Are One Problem
Adding a heavier point, insert, outsert, or collar does more than raise finished weight. It usually moves FOC forward and weakens the dynamic reaction. Adding rear weight can raise total weight while moving FOC back. A different shaft spine may also change GPI and move the finished total again.
Set FOC during component planning—not after the arrow is permanently assembled. Standard industry guidance is 10–15%. My Everyday Bow Hunter working guidance is 13–18%, while anything over 20% is considered high FOC. Do not force an FOC number if it pushes the build outside a safe spine recommendation or the bow manufacturer’s requirements.
This is why the build process may loop between the Arrow Weight Calculator, FOC Calculator, and Dynamic Spine Calculator before the test arrow is built.
What Arrow Weight Cannot Tell You
Finished weight does not tell you whether the broadhead is sharp, whether the arrow leaves the bow cleanly, whether the components are aligned, or whether the system will stay together at impact. Within a practical range from the same bow, added arrow mass normally adds momentum and improves penetration capability. The rest of the arrow determines how well that capability reaches and works at impact.
Use weight, speed, KE, and momentum to compare the build before impact. Then use construction quality, tuning, broadhead testing, and realistic practice to make sure the complete arrow delivers that capability cleanly and reliably.
My Recommendation
Use the Formula target as the center of the decision. Stay inside the working range unless you have a clear reason to move outside it. If trajectory is your main concern, work toward the lower end. If your distances are short and the bow carries the mass well, the upper end may fit. Then let the component plan and test arrow decide.
Frequently Asked Questions
Is a 400-grain arrow heavy enough for hunting?
It can be for some bows, but 400 grains is not a universal answer. It may sit inside one bow’s practical working range and below another bow’s target. Start with the manufacturer’s minimum, then use the Formula and your real bow specifications to set the range.
Is a heavier hunting arrow always better?
No. More mass normally reduces speed and increases trajectory drop. It often raises momentum, but it can also create spine, FOC, clearance, or tuning problems if the component plan is forced. The better arrow is the one that keeps the whole system working and proves itself in your bow.
How many grains per pound should a hunting arrow weigh?
Grains per pound is a useful starting reference, but it does not account for bow speed, draw length, normal distance, FOC, or dynamic spine by itself. That is why the Everyday Arrow Weight Formula uses the bow you actually shoot instead of stopping at one grains-per-pound rule.
BUILD FROM A BOW-BASED TARGET
Your Next Steps
Build the Complete Arrow Around That Weight
Once you have a useful weight range, the Hunting Arrow Planner helps you choose a real shaft and components, then check FOC, dynamic spine, speed, and trajectory as one connected build.
Use the Everyday Arrow System in this order. Expect to move back and forth between the planning tools as the component list develops.
🎯 Set the Formula Target and Working Range
Start with the bow you actually shoot instead of a universal arrow-weight rule.
📊 Compare Estimated Arrow Performance
Compare speed, kinetic energy, momentum, and nearby arrow-weight options.
📏 Set Safe Length and Preliminary Spine
Confirm broadhead clearance, follow the shaft maker’s chart, and use the planned shaft length and front weight.
⚖️ Plan the Shaft and Every Component
Include the broadhead, insert system, collar, nock, vanes, wrap, and every attached part.
🧭 Compare Projected FOC
Recheck FOC and dynamic spine as shaft length, front weight, or rear weight changes.
🏹 Build and Verify One Test Arrow
Measure the finished weight and FOC, tune the arrow, and prove the setup before completing the batch.
🏹 Return to the Everyday Arrow System
Use the full system to move from a bow-based target to one measured, tuned, and repeatable hunting arrow.
Want to see exactly what I’m carrying this season? Check out my Personal Bowhunting Gear List for 2026

Good instructive articles for bowhunting with a compound bow. Thank you
Robert Ray