
When I plan a hunting arrow, I do not start by gluing parts together and hoping the finished weight lands where I want it. I total the shaft and every component first. That simple step has saved me from building arrows that were heavier, lighter, or more rear-heavy than I intended.
That is where this Arrow Weight Calculator fits into the Everyday Arrow System. You can total one current or planned arrow, compare two component setups, check the result against the Everyday Arrow Formula, and save the numbers as a build sheet before you assemble the full batch.
Arrow Weight Calculator and Build Comparison
Choose one arrow when you only need the finished weight. Choose compare component changes when you want to see what happens after changing a broadhead, insert, outsert, collar, shaft, nock, wrap, or fletching setup.
- Enter the cut shaft length and GPI for the exact shaft model and spine.
- Add every front, rear, and extra component that will be installed on the arrow.
- Use the optional Formula comparison, component-change report, email, or CSV build sheet as needed.
Important: Follow your bow manufacturer’s minimum arrow-weight requirement. Use manufacturer specifications for planning, then weigh one completed test arrow before building the rest.
Want to Build the Whole Arrow in One Place?
If you want the guided path, the Hunting Arrow Planner walks you through arrow length, target weight, performance, components, FOC, and dynamic spine in one connected build.
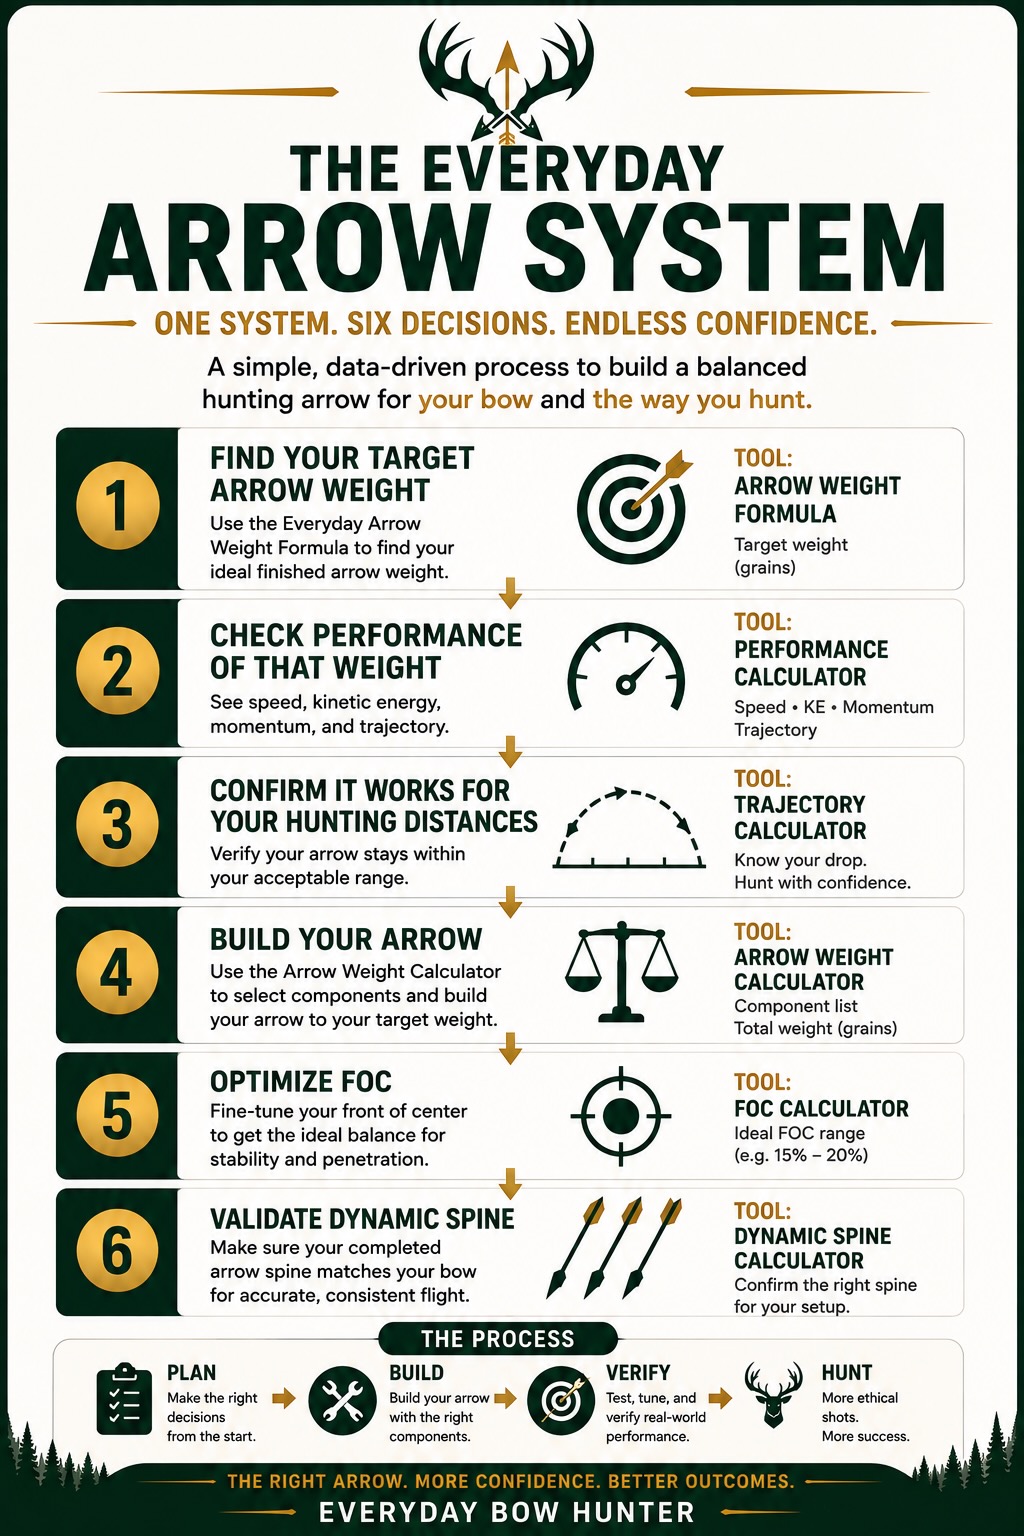
Where this fits: Use this calculator on its own to total a complete arrow before you buy parts or start assembling. If you are following the Everyday Arrow System, it is Step 4: turn the target you chose after checking performance and trajectory into a complete component plan. Once you have a candidate build, use the FOC Calculator (Step 5) to check balance, then the Dynamic Spine Calculator (Step 6) to make sure the shaft matches the complete setup.
If you still need to choose the exact shaft and compatible parts, use the Hunting Arrow Component Finder first. Return here when you already know the parts and want to total the build or compare weight changes by hand.
Find Exact Shafts and Compatible Parts →
📊 Keep the Whole Arrow Build Organized
The calculator gives you a component build sheet. Use the Arrow Planner when you want to work through the complete arrow plan in one guided tool.
What the Arrow Weight Calculator Is Doing
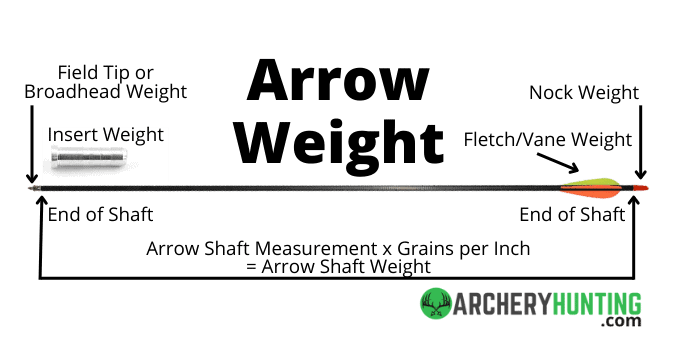
The math starts with the shaft. Arrow shafts are normally listed in grains per inch, or GPI. Multiply the cut shaft length by its GPI to estimate the shaft weight:
Cut shaft length × GPI = shaft weight
The calculator then adds every installed component:
Shaft + front components + rear components + other parts = finished arrow weight
The result shows the calculated finished weight to the nearest tenth of a grain and the rounded build weight as a whole number. Use the tenth-grain result when comparing small component changes. Use the rounded build weight when moving through the other Everyday Arrow calculators.
The calculator also separates weight by location. That matters because adding 25 grains to the broadhead is not the same as adding 25 grains to the nock or vanes. The total weight may change by the same amount, but the likely effect on FOC and dynamic spine is different.
How to Compare Arrow Component Changes
Comparison mode is the biggest improvement to this tool. Start with the primary build, copy it to the alternate build, and change only the part you are considering. The calculator will show the component difference, finished-weight change, and the likely direction of the FOC and dynamic-spine change.
- Heavier broadhead, insert, outsert, or collar: Adds front weight, normally raises FOC, and makes the arrow react dynamically weaker.
- Heavier nock, wrap, bushing, or fletching: Adds rear weight, normally lowers FOC, and may make the arrow react slightly stiffer.
- Different shaft length: Changes shaft weight and dynamic-spine demand at the same time. A longer shaft normally reacts weaker.
- Different shaft model or GPI: Changes the total weight, but GPI alone does not identify static spine. Check the exact shaft in the manufacturer’s chart and the Dynamic Spine Calculator.
- Different vane setup: Changes rear weight and may also change drag and broadhead control. Weight is only one part of that decision.
These are planning directions, not exact FOC or dynamic-spine calculations. Exact FOC requires the arrow length and balance point or the position of each component. Dynamic spine also depends on the bow and the shaft. Use the FOC Calculator and Dynamic Spine Calculator for those steps.
Compare the Build With the Everyday Arrow Formula
If you choose the optional Formula comparison, enter your actual peak draw weight, the bow’s IBO speed, your draw length, and your normal shooting distance. The calculator uses the same complete method as the Everyday Arrow Formula to find your target and working range. Those extra fields stay hidden when you only want to total or compare arrow components.
The Formula Target is the best all-around starting point, not a command to hit one exact grain. The lower end of the Working Range is Trajectory Focused. The target is the All-Around Hunting Balance. The upper end is Mass and Momentum Focused, which is the penetration-focused choice when the additional drop still fits the hunt. The finished arrow still has to pass spine, FOC, broadhead, clearance, tuning, and real-shot verification. I explain the reasoning in The Everyday Arrow Weight Formula.
What to Include in Finished Arrow Weight
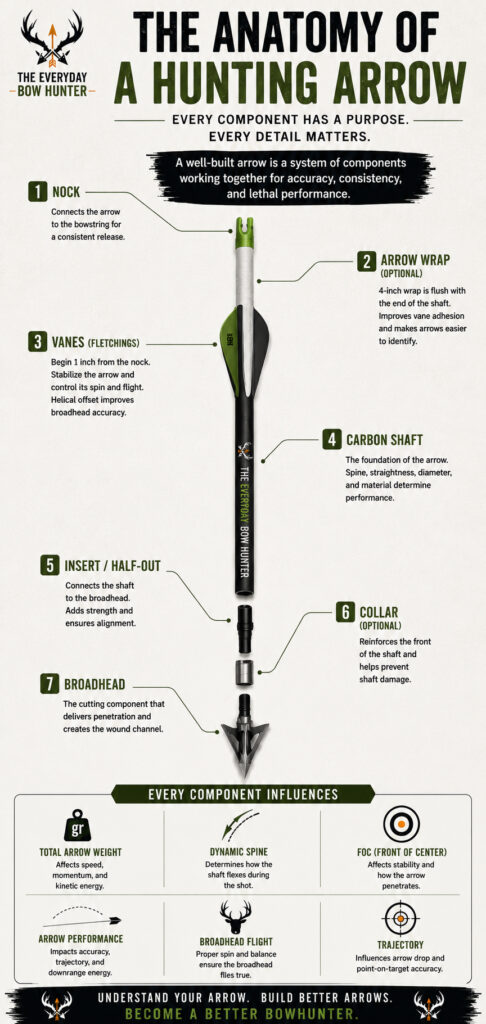
A finished arrow means the arrow exactly as it will be shot. Leaving out one small part may not look important, but several small parts can move the final total more than expected.
- Cut arrow shaft
- Field point or broadhead
- Insert
- Outsert or half-out
- Impact collar or footing
- Nock
- Nock bushing or pin
- Every vane or feather
- Arrow wrap or cresting
- Weight screws, adapters, and any other installed part
Arrow Shaft Weight and GPI
Use the GPI for the exact shaft model and spine you are planning to shoot. Different spine options in the same shaft family often have different GPI values. Use the cut shaft length, not the full factory length and not the total arrow length with the point installed.
For example, a 28-inch shaft listed at 9.5 GPI has a calculated shaft weight of 266 grains:
28 inches × 9.5 GPI = 266 grains
Front Components
The broadhead or field point is only part of the front-end total. Include the insert, outsert or half-out, impact collar, footing, weight screws, and adapters. These parts have a strong effect on the planned FOC and dynamic-spine demand because they sit at the front of the shaft.
Use field points and broadheads with matching advertised weights as your starting point, but do not assume they will hit together without tuning. Broadhead shape, drag, alignment, and bow tune still matter.
Rear Components
Add the nock, nock bushing or pin, every vane or feather, and the arrow wrap or cresting. Enter the actual vane or feather count as a whole number. If you use a lighted nock, enter the weight of the lighted nock you will actually shoot. Rear weight can lower FOC even when the total arrow weight is moving up.
Other Added Weight
Use the Other field for glue allowance or weight whose location is unknown. If a part sits at the front—such as a weight screw, adapter, or extra footing—add it to the closest front-component field. Add a rear part to the closest rear field. That gives the comparison enough information to provide a more useful FOC and dynamic-spine direction. When the location is unknown, the calculator will still include the grains in finished weight, but it will not claim which way FOC or dynamic spine will move.
What If I Do Not Know a Component’s Weight?
If a manufacturer does not list a component weight, weigh that part by itself on a digital grain scale. I also do this when I want the real weight instead of the advertised number. The TOPWEIGH arrow scale below is the inexpensive affiliate option I use. Its arrow holder also makes it easier to verify a completed arrow. If you buy through my link, I may earn a commission at no extra cost to you.
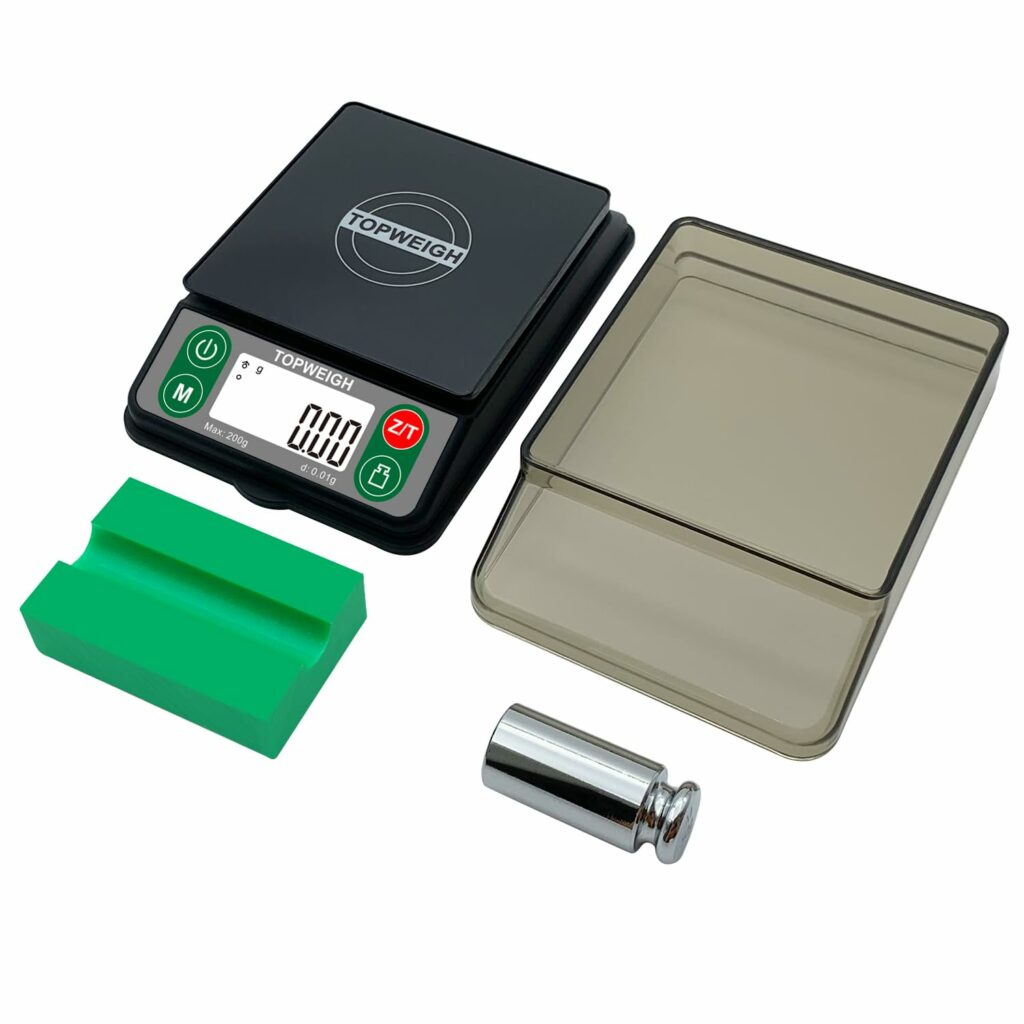
TOPWEIGH Arrow Scale with Arrow Holder
Cheapest & easiest arrow scale I’ve used.
How Accurate Is an Arrow Weight Estimate?
The calculator is as accurate as the component information you enter. Manufacturer specifications are a good planning source, but real parts can vary slightly. Glue, wraps, cut length, and normal manufacturing tolerances can also move the finished number.
My process is simple: plan the arrow here, build one complete test arrow, weigh it on a digital grain scale, and update the plan if needed. That gives you a verified build before you cut, glue, and fletch the full batch.
Arrow Weight Calculator Questions
What is arrow weight measured in?
Arrow weight is measured in grains. One grain is 1/7,000 of a pound. Use a grain scale made for archery or reloading when checking a completed arrow.
Can I calculate arrow weight before building the arrow?
Yes. Use the shaft GPI and listed component weights to create the planned build. The result is a strong starting estimate, but verify one completed arrow on a scale before building the batch.
Does a heavier broadhead change more than total arrow weight?
Yes. A heavier broadhead adds front weight, normally raises FOC, slows the arrow, and makes the arrow react dynamically weaker. Recheck FOC, dynamic spine, speed, and sight marks after a meaningful change.
Should I use advertised or measured component weights?
Use advertised weights while planning. Use measured weights when you have the parts in hand and want a tighter build sheet. The completed test arrow is the final check.
Where Arrow Weight Fits in the Everyday Arrow System
Finished weight is an early design checkpoint, not the end of the arrow build. Once the planned total looks right, carry the same parts through the rest of the process:
- Compare the weight with the Everyday Arrow Formula Target and working range.
- Set and verify the planned balance with the Arrow FOC Calculator.
- Check the shaft, length, and total front weight in the Dynamic Spine Calculator.
- Estimate speed, kinetic energy, and momentum in the Arrow Performance Calculator.
- Build one test arrow and follow the Arrow Build Guide through verification and tuning.
This is the part of arrow building I want to make easier. You should be able to see where a component change is taking the build before you spend the money or glue the parts together.
Stay lethal,
– Mike
CONTINUE THE ARROW SYSTEM
Your Next Steps
🧭 Start with the Hunting Arrow Planner
Use the guided path to carry one build through arrow length, target weight, performance, components, FOC, and dynamic spine.
You have a planned component total and, if needed, a comparison build. Now carry the same parts through balance, spine, performance, and final verification.
🎯 Understand the Formula Target
See why the target and working range provide a practical starting point.
🧭 Plan and Measure FOC
Set an FOC target before assembly, then confirm one completed test arrow.
🏹 Check Dynamic Spine
Use the planned shaft, length, and complete front-component weight.
📊 Estimate Arrow Performance
See how the planned weight affects speed, kinetic energy, and momentum.
🔧 Build and Verify One Test Arrow
Confirm the real weight and FOC, tune it, and then finish the batch.
🏹 Part of the Everyday Arrow System
Plan the parts, compare the tradeoffs, and verify the complete arrow before building the batch.
Want to see exactly what I’m carrying this season? Check out my Personal Bowhunting Gear List for 2026