
Buying Your First Arrows Should Not Be Guesswork
Buying arrows for a compound bow can feel harder than it should. A shaft label gives you a spine number, a GPI number, and sometimes several straightness grades. Then you still have to choose the arrow length, point weight, insert, nock, and fletching.
I have made the mistake of starting with a shaft I liked and trying to make the rest of the build work around it. A better way is to start with your bow, plan the complete arrow, and verify one test arrow before buying or building the full batch. That is the same process I use throughout the Everyday Arrow System.
This guide will walk you through that process in plain language. By the end, you will know what information to collect, what the numbers on an arrow mean, what to ask a pro shop, and how to avoid ordering a dozen arrows that do not fit your bow.
The Short Version
- Record your bow model, actual draw weight, draw length, and IBO speed.
- Find your Everyday Arrow Formula target and working range.
- Compare performance within that range.
- Confirm trajectory and sight plan before choosing final components.
- Plan the shaft and every component before assembly.
- Check projected FOC and dynamic spine.
- Build, measure, and tune one test arrow before finishing the batch.
Looking for a New Bow? Learn How to Buy the Right Compound Bow here now!
Not Sure What Arrows to Buy Yet?
Start with the Hunting Arrow Planner before you order or build a full batch. It helps you organize the bow measurements and arrow decisions, then gives you a plan you can follow yourself or take to an archery professional.
First, Learn the Arrow Terms That Matter
You do not need to become an arrow engineer to make a good purchase. You do need to understand a few terms so you can read a shaft chart and know what you are ordering.
- Finished arrow weight: The weight of the complete arrow as it will be shot. It includes the shaft, insert or outsert, collar, point or broadhead, nock, fletching, wrap, and any other installed part.
- Grains: The unit used to weigh arrows and components. There are 7,000 grains in one pound.
- GPI: Grains per inch. This tells you how much one inch of the bare shaft weighs. It is not the finished arrow weight.
- Static spine: The shaft’s measured stiffness. A lower spine number, such as 300, is stiffer than a higher number, such as 400.
- Dynamic spine: How stiff or weak the complete arrow reacts when it is shot from your bow. Shaft length, point and insert weight, bow settings, and other parts of the setup affect it.
- FOC: Front of center. This describes how far the arrow’s balance point sits in front of its physical center.
- Cut shaft length: The length of the carbon or aluminum shaft after it is cut. This is not automatically the same as your draw length.
The common beginner mistake is treating one number as the answer. Spine does not tell you total weight. GPI does not tell you spine. Draw length does not tell you a safe cut length. The complete setup is what matters.
Step 1: Collect the Numbers From Your Bow
Start with the bow because the arrow must match the bow—not the other way around. Write down the following information before you visit a pro shop or start shopping online:
- Bow make, model, and cam system
- Actual peak draw weight, measured at your current limb setting
- Measured draw length, not just the module label
- Manufacturer IBO speed
- Weight added to the string, including a peep, D-loop, and other items when needed for a speed estimate
- Your normal shooting distance
If you are unsure about draw length, begin with the Compound Bow Draw Length Calculator, then have the final setting checked with your bow. If you shop in person, bring the bow and your release. That gives the technician a chance to confirm the actual setup instead of working from a guess.
Safety first: Follow your bow manufacturer’s minimum arrow-weight requirement. That requirement controls even when a calculator or another hunter suggests something lighter.
Step 2: Find a Practical Finished-Weight Range
Do not begin by picking a random finished weight from a video, forum, or friend’s setup. Use the Everyday Arrow Weight Formula to find a target and a working range for your bow.
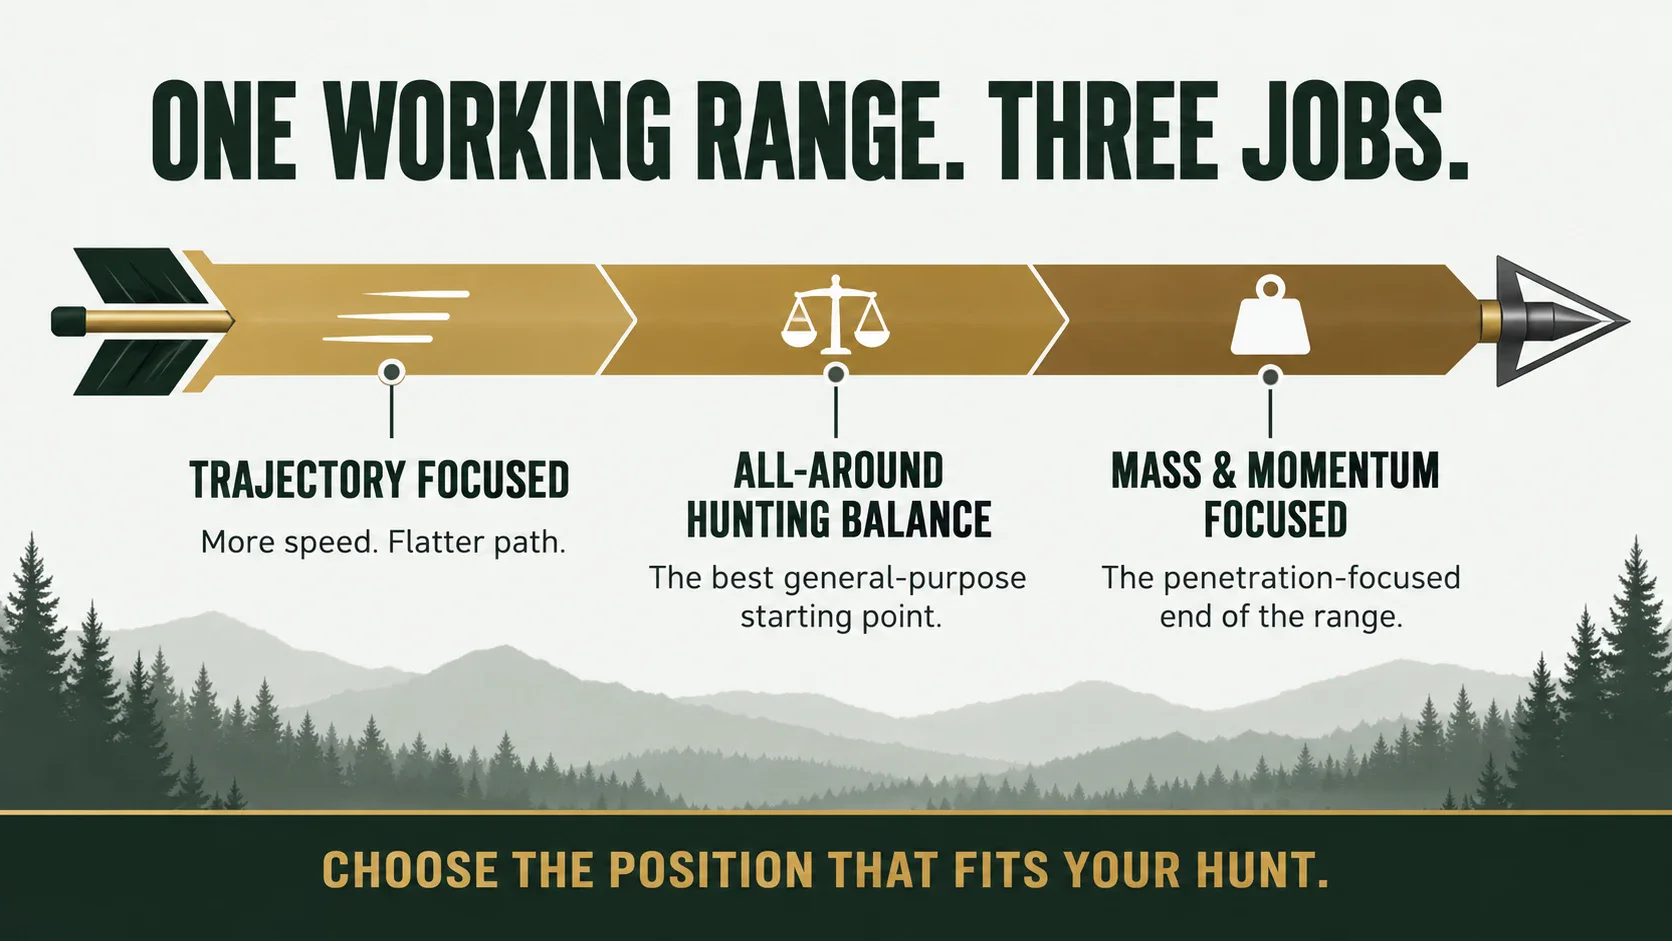
The target is the best general-purpose starting point, not a rule that every arrow must land on one exact grain. The lower end of the Working Range is Trajectory Focused. The Formula Target is the All-Around Hunting Balance. The upper end is Mass and Momentum Focused, a penetration-focused choice that accepts more drop in exchange for added mass and momentum.
This step narrows the field. Instead of shopping through every shaft on the wall, you now know the finished-weight range your components need to produce.
Step 3: Compare Speed, Kinetic Energy, and Momentum
Once you have a working weight range, use the Arrow Speed, Kinetic Energy, and Momentum Calculator. It estimates how different arrow weights may perform from your bow at launch and at your selected distance.
This is where you can see the tradeoff before you buy anything. Moving lighter normally raises estimated speed and flattens trajectory. Moving heavier normally lowers speed while increasing momentum. The calculator lets you compare those changes using your bow setup instead of relying on a general claim.
These are planning estimates. A chronograph is the best way to confirm the speed of the completed arrow from your bow.
Step 4: Confirm Your Trajectory and Sight Plan
Before you choose the final shaft and components, use the Hunting Arrow Trajectory Calculator to see how your planned arrow speed fits the distances you expect to shoot. It shows modeled rise, drop, time of flight, and the effect of a small ranging mistake.
For close-range hunting, this helps you see whether a simple zero and vertical window fit the way you hunt. For a slider, 3D course, or longer-range practice, use it to plan your sight marks through the distances you want to shoot. This is still a planning tool—verify the final arrow with your real bow, broadheads, and sight.
Step 5: Choose a Safe Shaft Length
Your arrow does not need to be a fixed amount longer than your draw length, and there is no safe universal rule such as cutting every shaft one inch in front of the rest. Bow geometry, rest position, broadhead clearance, and your hand position all matter.
Choose a shaft length that keeps the point or broadhead safely clear of your hand, rest, and riser at full draw. Have a qualified technician check it if you are unsure. Read How Long Should My Arrows Be? before approving a cut length.
Set the planned length before choosing the final spine. A longer shaft normally reacts dynamically weaker, while a shorter shaft normally reacts stiffer. Cutting first and checking spine later can force you into a different component plan.
Step 6: Plan Every Arrow Component
The finished weight comes from more than the shaft. Enter the shaft length and GPI in the Arrow Weight Calculator, then add every component you plan to install:
- Shaft
- Insert, outsert, and collar
- Field point or broadhead
- Nock and nock bushing
- Fletchings and wrap
- Lighted nock or any other installed part
Use the comparison option only when you want to compare changes. For example, copy your first plan and change the broadhead from 100 to 125 grains, replace the insert, or compare two fletching setups. The calculator shows the finished-weight difference and the likely direction of the FOC and dynamic-spine change.
A Small Tool That Prevents Expensive Mistakes
Manufacturer component weights are useful for planning, but completed arrows can vary. A digital arrow scale lets you confirm the real finished weight and compare arrows across the batch.
If you need one, the Topweigh Arrow Scale is a practical option because it reads directly in grains and is made for arrows. Buy a scale only if you do not already have an accurate grain scale that can hold a complete arrow.
Step 7: Plan FOC Before You Glue the Arrow Together
FOC is difficult to change after the arrow is built because changing it usually means changing component weight or location. Use the Arrow FOC Calculator in build mode to estimate the balance of a planned arrow before permanent assembly.
- 10–15% FOC: Common industry guidance
- 13–18% FOC: My normal Everyday Arrow System working range
- More than 20% FOC: Generally considered high FOC
More front weight raises FOC, but it also raises finished weight and usually makes the arrow react dynamically weaker. More rear weight normally lowers FOC and may make the arrow react slightly stiffer. That is why FOC must be considered with total weight and spine—not treated as a separate score to chase.
Step 8: Check the Candidate Shaft and Spine
Required Spine is the continuous stiffness target for the complete setup. Start there. Then map that target to the spine sizes actually sold in the exact shaft family you want to buy. The Dynamic Spine Calculator uses your actual draw weight, planned shaft length, bow speed, and complete front-end weight so the requirement can move gradually instead of jumping from one chart box to another.
If the Required Spine is about 367 and that shaft family is sold in 400, 350, and 300, the 350 is normally the useful available choice. It gives that setup a modest stiff-side margin without jumping all the way to a shaft that is stiffer than needed. The exact choice still has to agree with the current guidance for that shaft family.
You may see a 340 in one brand and a 350 in another. Those are nearby static-spine sizes, but they are not a universal label that should be swapped without checking the exact shaft. Use the choices that manufacturer actually sells, confirm its current guidance, and then tune the completed arrow from your bow.
How to Compare Arrow Shafts Without Getting Lost
Price matters, but it should not be the first filter. Compare shafts in this order:
- Required-spine fit: Remove shafts whose available spine sizes do not provide a sensible match to the calculated requirement and the manufacturer’s current guidance for that exact family.
- Safe available length: Make sure the shaft can be cut to the length you need.
- GPI: Check whether the shaft can reach your finished-weight plan without forcing extreme component choices.
- Component system: Confirm that the insert, outsert, collar, nock, and point sizes you need are available and compatible.
- Straightness and weight consistency: Tighter tolerances can help consistency, but they cost more. A well-selected and well-built mid-priced shaft is often a better beginner purchase than an expensive shaft with the wrong spine or components.
- Replacement availability: A shaft you can easily replace may be more useful than a hard-to-find model.
Use the Hunting Arrow Component Finder to compare exact shaft grades, spines, dimensions, and reviewed component fit before a shop cuts or assembles the order.
Compare Shafts and Compatible Parts →
Do not assume one brand is automatically the budget, midrange, or advanced choice. Prices, component packages, and shaft lines change. Compare the exact model and included components.
Deciding Between Prefletched and Custom Arrows
Prefletched Arrows
Prefletched arrows are usually the easiest starting point. The nocks and vanes are already installed, and a pro shop can cut the shafts and install the front components. They work well when the available shaft, vane, and component combination fits your plan.
A Smart Pre-Cut Buying Option
If you only build six to twelve arrows a season, you do not need to buy an arrow saw just to make one correct batch. Once you know your proper cut length, spine, and front-end plan, a pre-cut, prefletched arrow can be the better buy. Scheels offers a Victory VAP TKO Elite pre-cut option with AAE 2.6 Hybrid vanes, which is a good path for a hunter who wants a quality arrow without buying every home-building tool first.
That does not skip the planning. Confirm the cut length, spine, insert choice, broadhead weight, and finished-weight target before you order. I would still start with one test arrow when the retailer or shop can make that possible, then verify tune and broadhead flight before committing to the full batch.
Custom Arrows
A custom build gives you more control over vane style, helical or offset, wraps, nocks, inserts, collars, and point weight. That control is useful when you have a clear reason for each change. It is not automatically better, and it creates more chances to build the wrong combination if you skip the planning work.
For most beginners, I would rather see one carefully planned prefletched or shop-built test arrow than a dozen custom arrows ordered from a list of popular parts.
Build the Arrows Yourself or Take the Plan to an Archery Professional
If you already have the tools and know how to cut, square, assemble, and tune arrows, you can follow the process in this guide and build the setup yourself. Start with one test arrow. Do not build the full batch until that arrow fits the bow, tunes correctly, and shoots the way it should.
If you are a beginner, you do not need to know every arrow term before you ask for help. Take your bow and release to a good archery shop. Bring your measured draw length if you know it, the broadhead or point weight you plan to use, the parts you already bought, the game you hunt, and the distance you normally shoot. If you do not know your draw length or actual draw weight, have the shop measure them. Do not guess.
- Your bow and release
- Your measured draw length, if you know it
- Your broadhead or intended point weight
- Your normal hunting distance and the game you hunt
- Any shafts, inserts, collars, nocks, or vanes you already bought
- Your Hunting Arrow Planner results, if you started the plan online
Ask the archery professional to check the plan before anything is cut or permanently installed. The goal is the same whether you do the work or the shop does it: build one test arrow, shoot it from your bow, and make sure the complete setup works before finishing the rest.
What to Ask at the Archery Shop
A good shop can help, but you should still understand the plan. Bring your bow, release, written bow measurements, planned finished-weight range, and any point or broadhead weight you expect to use.
- Can you confirm my actual draw weight and draw length?
- What shaft length gives this setup safe clearance at full draw?
- Which shafts fit the current manufacturer spine chart with my planned front weight?
- What insert, collar, nock, and fletching parts are included?
- Can you cut and square the shaft ends before installing the components?
- Can we build one test arrow before I commit to the full batch?
- Can you weigh, spin-check, and help tune the completed arrow?
A Simple Pro-Shop Script
“I am buying arrows for this bow, and I want to make sure the complete setup is right before I order or build a full batch. Can you check my draw length and actual draw weight, help me choose a safe arrow length and the correct spine, and explain the component options? I want to build one test arrow first, shoot it from my bow, and make sure it works before we finish the rest.”
If you used the Planner, add: “I also brought the arrow plan I started online. Can we check it against my actual bow before anything is cut or installed?”
What to Check Before Ordering Arrows Online
- The exact shaft model and spine
- Whether the listed length is full shaft length or your requested cut length
- Which components are included and which are installed
- The weight of the insert, outsert, collar, nock, and fletchings
- Whether cutting, squaring, and insert installation cost extra
- Whether the seller will build one test arrow
- The return policy for cut or custom arrows
Do not place the order if the seller cannot tell you what components are included. A shaft that looks correct on the product page can finish much heavier, lighter, or differently balanced than expected after every part is added.
Build and Verify One Test Arrow
A calculator helps you plan, but the completed arrow gives you the answer. Build one arrow with the exact shaft, length, insert system, point weight, nock, wrap, and fletching you intend to use.
- Weigh the finished arrow.
- Measure its actual FOC.
- Confirm point and broadhead clearance.
- Check shaft and broadhead alignment.
- Paper tune or bare-shaft tune as appropriate.
- Confirm broadhead grouping with your field points.
- Use a chronograph if you want verified speed.
If the test arrow does not match the plan, change the plan before building the rest. That is much cheaper than discovering the problem after the inserts are installed in a dozen shafts.
Beginner Arrow-Buying Mistakes to Avoid
- Copying another hunter’s setup: A different bow, cam, draw length, draw weight, or shaft length can change the result.
- Choosing spine from draw weight alone: Shaft length and front weight also matter.
- Confusing GPI with finished weight: GPI covers the bare shaft by the inch, not the complete arrow.
- Cutting arrows before the plan is finished: Length affects both total weight and dynamic spine.
- Adding front weight without rechecking spine: More point or insert weight usually makes the arrow react weaker.
- Assuming a broadhead fixes arrow flight: Fixed and mechanical broadheads still require a correctly spined and tuned arrow.
- Ordering the full batch first: Verify one test arrow before making the expensive commitment.
Frequently Asked Questions About Buying Compound-Bow Arrows
What arrow spine do I need for my compound bow?
Use the Dynamic Spine Calculator to find the continuous Required Spine from your actual draw weight, bow speed, planned shaft length, and complete front-end weight. Then map that requirement to the spine sizes sold in the exact shaft family and confirm the choice against the manufacturer’s current guidance. Draw weight by itself is not enough.
Should a beginner buy prefletched or custom arrows?
Prefletched or pro-shop-built arrows are often the simplest starting point when the available parts fit the plan. Choose custom arrows when you understand why you need different vanes, inserts, nocks, or other components.
How many arrows should I buy?
Start with one test arrow whenever the seller or shop allows it. Once that arrow matches the planned weight and FOC, clears the bow safely, and tunes correctly, buy or build the number you need from the same shaft model and component plan.
Do mechanical broadheads allow a weaker arrow spine?
No. A mechanical broadhead may show less steering than a fixed blade, but it does not make a weak spine acceptable. Use the manufacturer’s spine chart and tune the complete setup for either broadhead type.
Is a more expensive arrow always better?
No. Tighter straightness and weight tolerances can improve consistency, but the correct spine, safe length, compatible components, careful assembly, and good tuning matter first. A costly arrow built around the wrong plan is still the wrong arrow.
CONTINUE THE EVERYDAY ARROW SYSTEM
Your Next Steps
Choose the shaft and components as one finished arrow rather than making isolated buying decisions.
1. Start with the Hunting Arrow Planner
Turn your bow measurements and hunting needs into a connected arrow plan you can build yourself or take to an archery professional.
2. Use the Everyday Arrow System
Understand why arrow length, weight, components, FOC, spine, and trajectory must work together.
3. Use the Arrow Build Guide
Turn the recommendation into a finished hunting-arrow plan.
4. Check Dynamic Spine
Compare projected shaft setups before ordering components.
Part of the Everyday Bow Hunter System
Want to see exactly what I’m carrying this season? Check out my Personal Bowhunting Gear List for 2026