
ARROW PLANNER LESSON 2
Choose Weight, Performance, and Trajectory
Arrow weight is a tradeoff, not a contest. More weight can add momentum and may quiet the bow, but it also reduces speed and changes the arrow’s path.
The Planner lets you compare those effects around your bow and the distances you expect to hunt. The goal is a usable balance, not the heaviest or fastest arrow possible.
This lesson explains the decisions in more detail. You will also see when one of the standalone calculators can help you research a question before returning to the connected plan.
Choose the Working Weight
The Everyday Formula Target gives you a bow-specific planning point. The Working Range shows nearby weights that may still fit the job without pretending that one grain number is mandatory.
In this system, balanced means balancing arrow speed and trajectory against arrow mass and momentum for your bow and normal hunting distance. The Formula Target is not a universal perfect weight. It is the best general-purpose starting point produced from the bow and hunting facts you entered.
Example: One Bow, Three Valid Choices
Suppose the Planner gives you a 460-grain Formula Target with a 435–485-grain Working Range. These are not three quality levels. They are three different performance priorities for the same bow and hunt.
- 435 grains — Trajectory Focused: More speed, shorter flight time, and less drop, with less mass, momentum, and penetration capability than the heavier choices.
- 460 grains — All-Around Hunting Balance: The best general-purpose starting point for keeping trajectory practical while carrying useful arrow mass and momentum.
- 485 grains — Mass and Momentum Focused: The penetration-focused end of the range. It adds mass and momentum and improves penetration capability while accepting lower speed and more trajectory drop.
Within a practical range from the same bow, the added mass and momentum give the heavier choice better penetration capability. Use the performance comparison, spine, FOC, broadhead, clearance, tuning, and real-shot checks to make sure the complete arrow delivers that capability cleanly and reliably.
All three are inside the Formula range. Use Performance and Trajectory to decide which tradeoff fits your normal shot window, then let the real shaft and compatible components determine the finished weight.
Start with the Formula result when you need guidance. Choose a custom target when you already have a deliberate finished weight to evaluate, such as a known arrow, a shop recommendation, or a component plan you want to test.
Always follow the bow maker’s minimum finished-arrow weight. A calculated target never overrides that safety requirement.
How to Choose Within the Working Range
Begin near the middle when you do not yet have a reason to move. Then use the way you hunt to decide whether another part of the range deserves comparison.
- Compare the lighter side when longer shots, smaller pin gaps, or a flatter path matter more.
- Compare the heavier side when typical shots are closer and you want to study more momentum, a quieter bow, or a heavier component system.
- Stay near the selected target when the performance and trajectory already fit the hunt. More weight is not automatically an improvement.
Look at the change, not just the final number. Ask what you gained in momentum and what you gave up in speed and trajectory.
When to Research Arrow Weight More Deeply
Use the Everyday Arrow Weight Formula when you want to study how the starting target is built from draw weight, bow speed, draw length, and typical distance.
Use the Arrow Speed, Kinetic Energy, and Momentum Calculator when you want a wider side-by-side comparison of arrow weights or want to enter a measured chronograph speed.
These are research tools. They do not silently change the Planner. Return to the Planner and deliberately select or enter the weight you decide to carry forward.
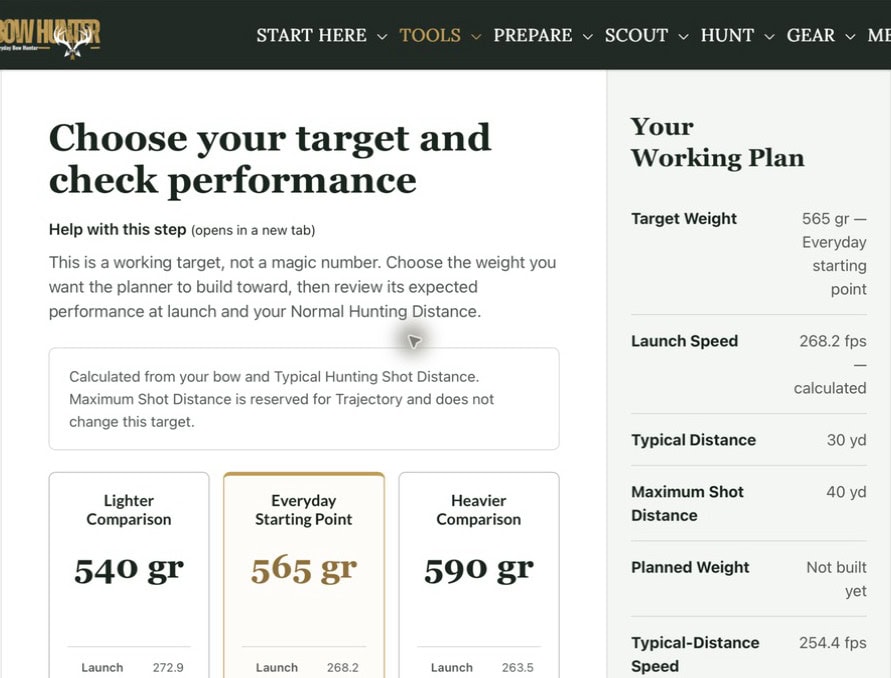
Read the Performance Estimate
Launch Speed
Launch speed is the estimated arrow speed as it leaves the bow. It gives you the starting value used by the Planner’s connected flight model.
Speed at Typical Hunting Distance
This estimate shows how much speed the modeled arrow carries to the distance where you expect most opportunities. It is more useful for the hunting plan than looking only at launch speed.
Kinetic Energy
Kinetic energy is energy created by motion. Because speed is squared in the formula, a faster arrow can show a large kinetic-energy number.
Use it to compare how weight and speed interact. It does not describe every part of penetration or broadhead performance.
Momentum
Momentum describes how strongly a moving arrow tends to keep moving. It increases with arrow weight and speed.
Use it as another comparison tool, not a stand-alone guarantee of penetration or recovery.
Use all four values to understand the tradeoff. Do not select a hunting arrow from one performance number by itself.
Use Each Distance for the Right Job
Typical Hunting Distance is the distance where you expect most of your shot opportunities. The Planner uses it for the downrange performance estimate, the shot-window check, and the zero comparison.
Maximum Shot Distance controls how far the trajectory chart is shown. It does not change target weight, downrange performance distance, the shot-window check, or the zero comparison.
Choose the Sight Zero and Allowance
Most modern compound-bow hunting sights begin with a 20-yard reference, and many hunters use additional pins or a sight tape beyond that distance. The Planner therefore uses 20 yards as the minimum recommended primary zero and lets you compare standard longer references.
Your sight zero is the distance where the selected pin or sight mark places the arrow on the aiming point. The arrow can travel above that aiming line before returning to the zero and dropping below it farther away.
Your rise-or-drop allowance is the vertical window you want to study around that line. A ±4-inch allowance means you are checking where the modeled arrow stays no more than four inches high or four inches low.
A ±4-inch allowance is a practical starting comparison, but it is not a rule every hunter must follow. A larger vital area, a different aiming method, or a personal accuracy limit may lead you to study another allowance.
Choose the zero and allowance that match the way you aim. The Planner shows the modeled result and may identify a closer compared fit, but it does not change your selected zero unless you apply that choice.
The Key Trajectory Decision
First decide whether you are studying a center hold or a multi-pin or sight-tape plan. A center hold means using the same aiming reference without holding higher or lower to correct for the arrow’s path.
- For a center-hold study, compare how far the arrow remains inside the selected rise-or-drop allowance.
- For a multi-pin or sight-tape plan, focus on the actual rise or drop at each distance and whether the pin gaps remain practical.
- If the selected zero already matches how your sight is built, keep it unless the comparison gives you a clear reason to change.
The longest center-hold window is not automatically the best sight plan. A familiar 20-yard zero with known pins may be more useful than a different zero chosen only to improve one modeled window.

Read the Trajectory Notice
The trajectory notice explains how the modeled arrow path fits the planning window you selected. Use it to understand the result and decide whether the same zero, allowance, and arrow plan still make sense for the way you hunt.
Trajectory Fits Within Your ±X in Allowance
This green status means the displayed modeled path remains inside the selected allowance through Typical Hunting Distance. Continue with the selected trajectory plan if it also fits your pins, sight tape, and real hunting use.
Trajectory Extends Outside Your ±X in Allowance
This gold status means the modeled center-hold window ends before Typical Hunting Distance. Review the end of the usable window and the arrow’s rise or drop at the typical distance.
You may choose another zero, allowance, or weight, but you do not have to change a 20-yard zero that fits your sight and shooting process. Use the correct pin, sight-tape mark, or hold at distances beyond the center-hold window.
The Planner replaces `X` with the allowance you selected, such as ±4 inches, ±5 inches, or ±8 inches.
For example, a 20-yard zero may keep an arrow inside ±4 inches through about 25.6 yards while the arrow is 8.6 inches low at 30 yards. That does not make the arrow or zero invalid. It tells you that a center hold is outside the selected four-inch window at 30 yards and another aiming reference is required.
The Planner applies the allowance to the value it displays. A raw modeled result such as 4.012 inches, shown as 4.0 inches, is not labeled outside a displayed ±4.0-inch allowance.
When to Use the Standalone Trajectory Calculator
Use the Hunting Arrow Trajectory Calculator when you want a deeper comparison than the guided Planner step provides.
It can help when you want to:
- compare several arrow weights or measured launch speeds;
- study more sight-zero choices;
- examine the complete arrow path at additional distances;
- compare different rise-or-drop allowances; or
- review an existing arrow without changing a Planner build.
Keep the same bow, arrow, sight, and distance facts when moving between tools. The standalone result does not update the Planner, so return and apply the chosen weight, zero, or allowance yourself.

What the Model Cannot Prove
The Planner estimates trajectory from the bow and arrow information entered. Chronograph speed, real sight height, drag, weather, tune, and the completed arrow can change the actual sight marks.
After building one complete test arrow, confirm its speed when possible and shoot the real distances. Use the model to plan; use the target to verify.