
Enter your arrow speed, choose the bow-sight zero you actually use, and set the amount of vertical error you are willing to accept. The calculator will show your arrow’s rise, drop, center-hold windows, time of flight, and the cost of a small ranging mistake.
I built this tool because arrow speed by itself does not tell you how an arrow will fly through your real sight setup. Arrow weight changes speed, but your chosen zero also changes the angle of the arrow. That angle affects how high the arrow rises before it comes back to your line of sight.
In the Everyday Arrow System, this is Step 3. Steps 1 and 2 help you choose a target arrow weight and check speed, kinetic energy, and momentum. This calculator connects those numbers to the part you must aim with: your bow sight, your zero, your hunting distances, and your ranging margin.
Use a chronograph speed when you have one. If you are still planning the arrow, estimate speed from your bow and finished-arrow weight. The Advanced Arrow Profile can then refine the downrange estimate with your shaft diameter, vane setup, and broadhead style.
Want to Build the Whole Arrow in One Place?
If you want the guided path, the Hunting Arrow Planner walks you through arrow length, target weight, performance, components, FOC, and dynamic spine in one connected build.
SEE YOUR PATH
Rise, drop, and zero window
See where your arrow crosses the line of sight, how high it rises, how far it drops, and where it leaves the vertical window you chose.
SET YOUR STANDARD
Use the zero you really run
Choose the 20-, 25-, 30-, 40-, 50-, or 60-yard zero you actually use, then set the vertical room you accept.
PLAN WITH CONFIDENCE
Understand ranging error
Compare the impact of a three- or five-yard ranging mistake before it becomes a problem in the field or on a 3D course.
What This Calculator Is—and What It Is Not
This is a planning tool. It gives you a useful model of your arrow’s path based on the numbers you enter. It is not a replacement for a chronograph, a properly tuned bow, broadhead practice, or verified sight marks.
Use it to narrow down a plan. Then shoot that plan. Paper tune, broadhead tune, confirm your zero, and verify your tape or pins at real distances before the season.
Why I Start With a 25 Yard Zero and ±4 Inches
My standard close-range whitetail setup starts with a 20- to 25-yard zero and about ±4 inches of vertical room. I am looking for a setup where the arrow stays about four inches high or low of my line of sight for a useful stretch of close hunting distance.
This works well for the way I often hunt: deliberate shots from a treestand or saddle, usually at close range, where a simple center hold can be valuable. The calculator calls this “My standard 20–25 yd / ±4 in starting point.” It is my field preset, not the only good setup.
It is a starting point, not a universal rule.
Four inches is not a magic number or a published vital-zone size. If you use fixed pins, a slider, a 40-yard zero, a wider vertical window, or different distance limits, choose the settings that match your sight plan and the shots you are willing to take.
Start With Your Arrow Speed
Option 1: I have a chronograph speed
This is the best route when the arrow is already built. Enter the average from at least three shots with the finished hunting arrow—the shaft, insert, point or broadhead, nock, vanes, wrap, and every other part. Do not substitute an advertised IBO speed for a real chronograph number.
Option 2: Estimate speed from my bow
Use this when you are planning a new build or do not yet have a chronograph reading. The calculator uses the bow and finished-arrow details it asks for to create a working launch-speed estimate. That makes it useful for comparing possible arrow weights and seeing how a proposed build may behave before you finish it.
An estimated speed is a planning number, not a final sight-tape number. Once the arrow is built, chronograph it, update the calculator, and then verify your real pins or tape.
Use the Advanced Arrow Profile for a Better Downrange Estimate
The Advanced Arrow Profile is separate from how you enter speed. It is recommended because it adds the details that influence aerodynamic drag: shaft outside diameter, vane configuration, and point or broadhead profile. It uses those details to make the downrange-speed estimate better match the arrow you are actually shooting.
Arrow labels such as .166 and .204 usually describe inside diameter. Drag is affected by outside diameter, which can change by shaft model and spine. Choose a diameter class for a starting point, then enter the manufacturer’s exact outside diameter when you have it.
Without the Advanced Arrow Profile, the calculator uses one general hunting-arrow retention setting. With it, the path is still an estimate, but it is a better-matched estimate. Use the optional comparison speed to see how a second launch speed would change trajectory while keeping the same arrow, profile, sight height, and selected zero.
How to Use the Calculator
- Choose your speed path. Enter a chronograph speed when you have one, or estimate speed from your bow when you are planning a build.
- Use real input whenever you have it. A chronographed finished-arrow speed is better than advertised IBO speed or an estimate.
- Add the Advanced Arrow Profile when you can. Enter the shaft outside diameter, vane setup, and point or broadhead profile for a better downrange estimate. Add a comparison speed if you want to see a second speed against the same setup.
- Enter your finished arrow weight and sight height. Small details matter when you are mapping a path.
- Choose your planning approach and real zero. Start with my standard 20–25 yard / ±4-inch plan if it fits your close-range hunting. Then select the 20- or 25-yard zero you actually use. If your system is built around 40 yards, use 40.
- Choose your own vertical window. My ±4-inch window is a starting point for close hunting. You can select a larger window or enter a custom one.
- Set the distance you want to study. For close hunting, 30 or 40 yards may be enough. For a TAC or 3D course, extend the view to 100 yards.
- Read the result, then verify it. Use the chart and table to plan your sight. Confirm it by shooting real arrows at real distances.

How to Read Your Results
Start with your chosen zero
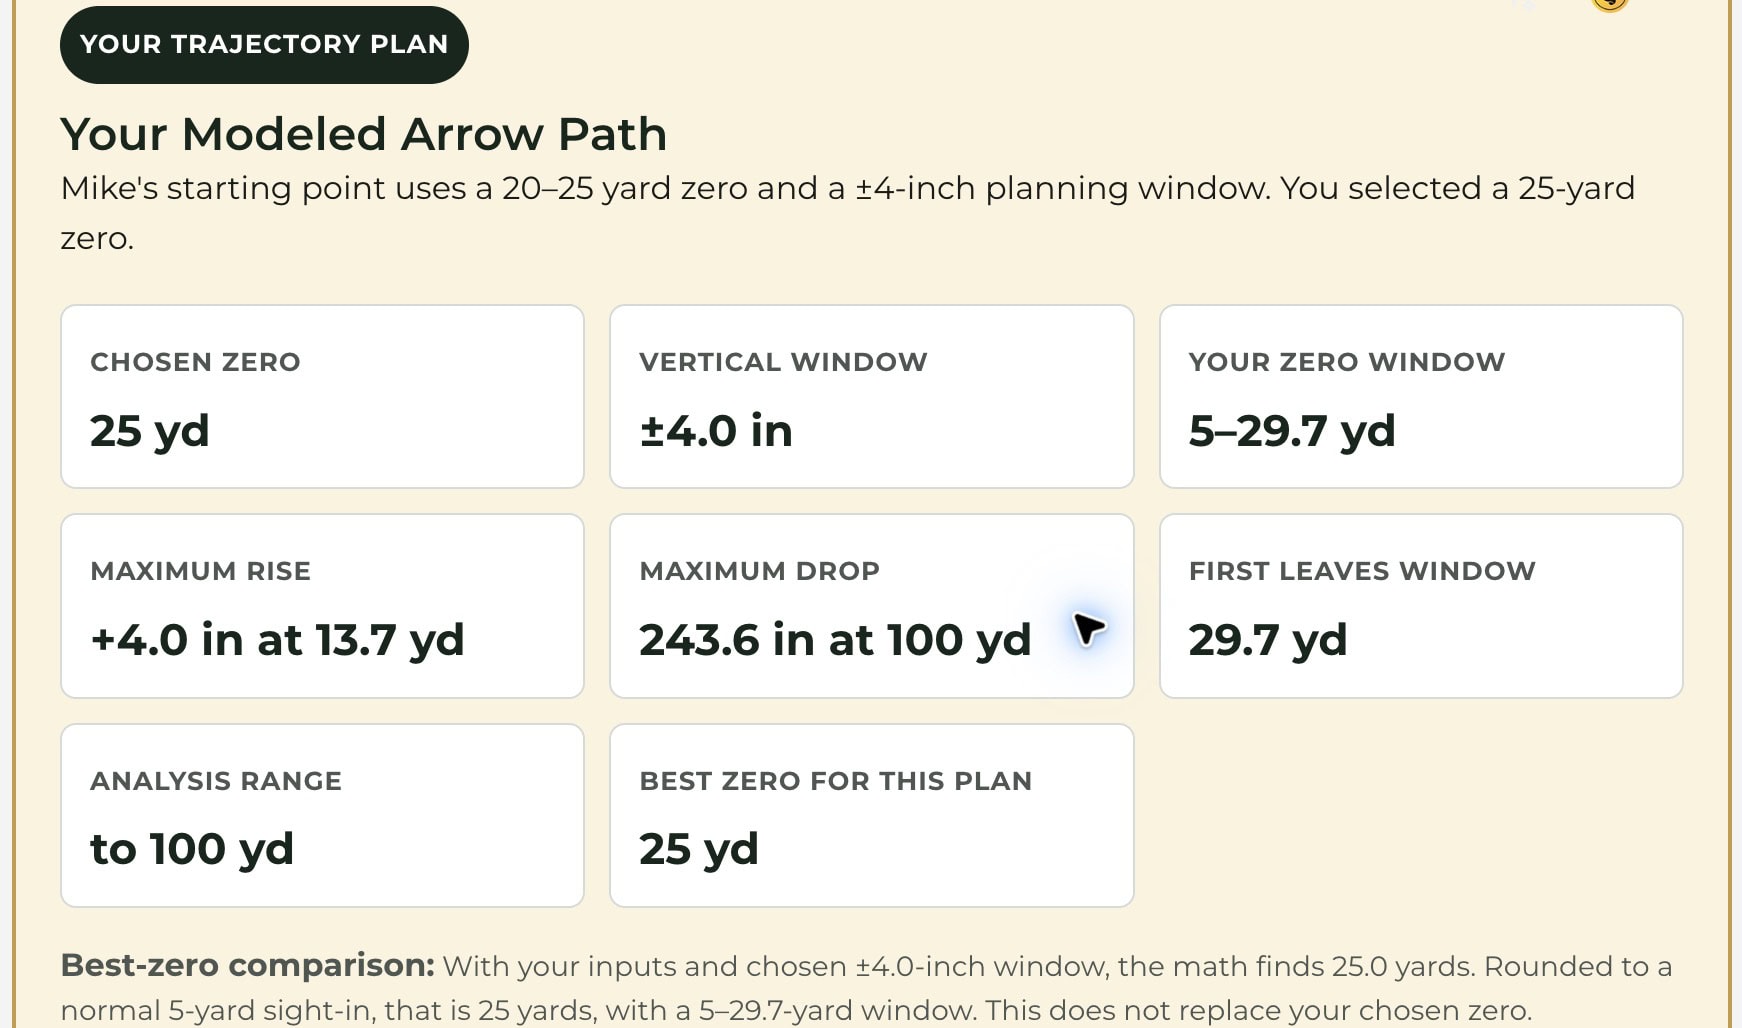
Your selected bow-sight zero is always exactly 0.0 inches in the model. If you choose a 25-yard zero, the arrow is on your line of sight at 25 yards. The path may cross the line of sight once at a closer distance, but that first crossing does not replace the zero you selected.
Your center-hold windows
A center-hold window is any continuous distance span where the modeled arrow stays inside the vertical limit you chose. With a ±4-inch window, every result from 4 inches high through 4 inches low is inside the window.
Some arrow paths stay inside the window until they finally drop below it. Others rise above the upper limit, come back inside, cross the selected zero, and later fall below the lower limit. The main result reports the first continuous center-hold window beginning at 5 yards. Use the chart and 5-yard table to see what happens after that first exit, including whether the arrow later comes back inside.
How the boundary is counted: The calculator rounds each modeled path value to the nearest tenth of an inch before checking whether it is inside your window. With a ±4-inch window, an underlying value such as +4.012 or -4.012 rounds to +4.0 or -4.0 and still counts as inside. The arrow leaves the window when the rounded result moves beyond that limit.
What Happens After the First Exit
If the arrow rises above your upper limit, the first center-hold window ends at that high exit. The arrow may come back inside later as it approaches the selected zero, but that later span is not included in the main center-hold distance. The chart and 5-yard table show the later path so you can see where it returns and where it finally drops below the lower limit.
If the path never rises above your upper limit, the first window ends when the arrow drops below the lower limit—or at the end of the distance you chose to analyze if it stays inside the whole way.
Maximum rise and maximum drop
Maximum rise is the highest point above your line of sight. Maximum drop is the lowest point below it. Both are measured across the full distance you selected. If you analyze through 100 yards, maximum drop describes the whole 100-yard model, not just the center-hold window.
Best practical zero
The calculator first finds the exact mathematical zero that gives the longest continuous center-hold window beginning at 5 yards. It then tests the normal 5-yard sight-in choices from 10 through 60 yards.
The best practical zero is the 5-yard choice that gives the longest first center-hold window. If two choices are effectively tied, the calculator favors the one closer to the mathematical result, then the one closer to 25 yards. This comparison does not replace the zero you selected or make your vertical window larger.
The Right Vertical Window Depends on How You Hunt
There is no one vertical window that fits every bowhunter. A hunter who wants a tight close-range point-blank setup may like a four-inch window. Another hunter may be comfortable with six, eight, or ten inches. A target archer shooting known distances with a precise tape may care more about exact marks than a point-blank window.
The important thing is to choose the window on purpose. Do not use a number just because it looks good on a screen. Use a number that works with your pin gaps, your broadhead group, the vital area you are protecting, and the distances you are truly willing to shoot.
How This Fits the Everyday Arrow System
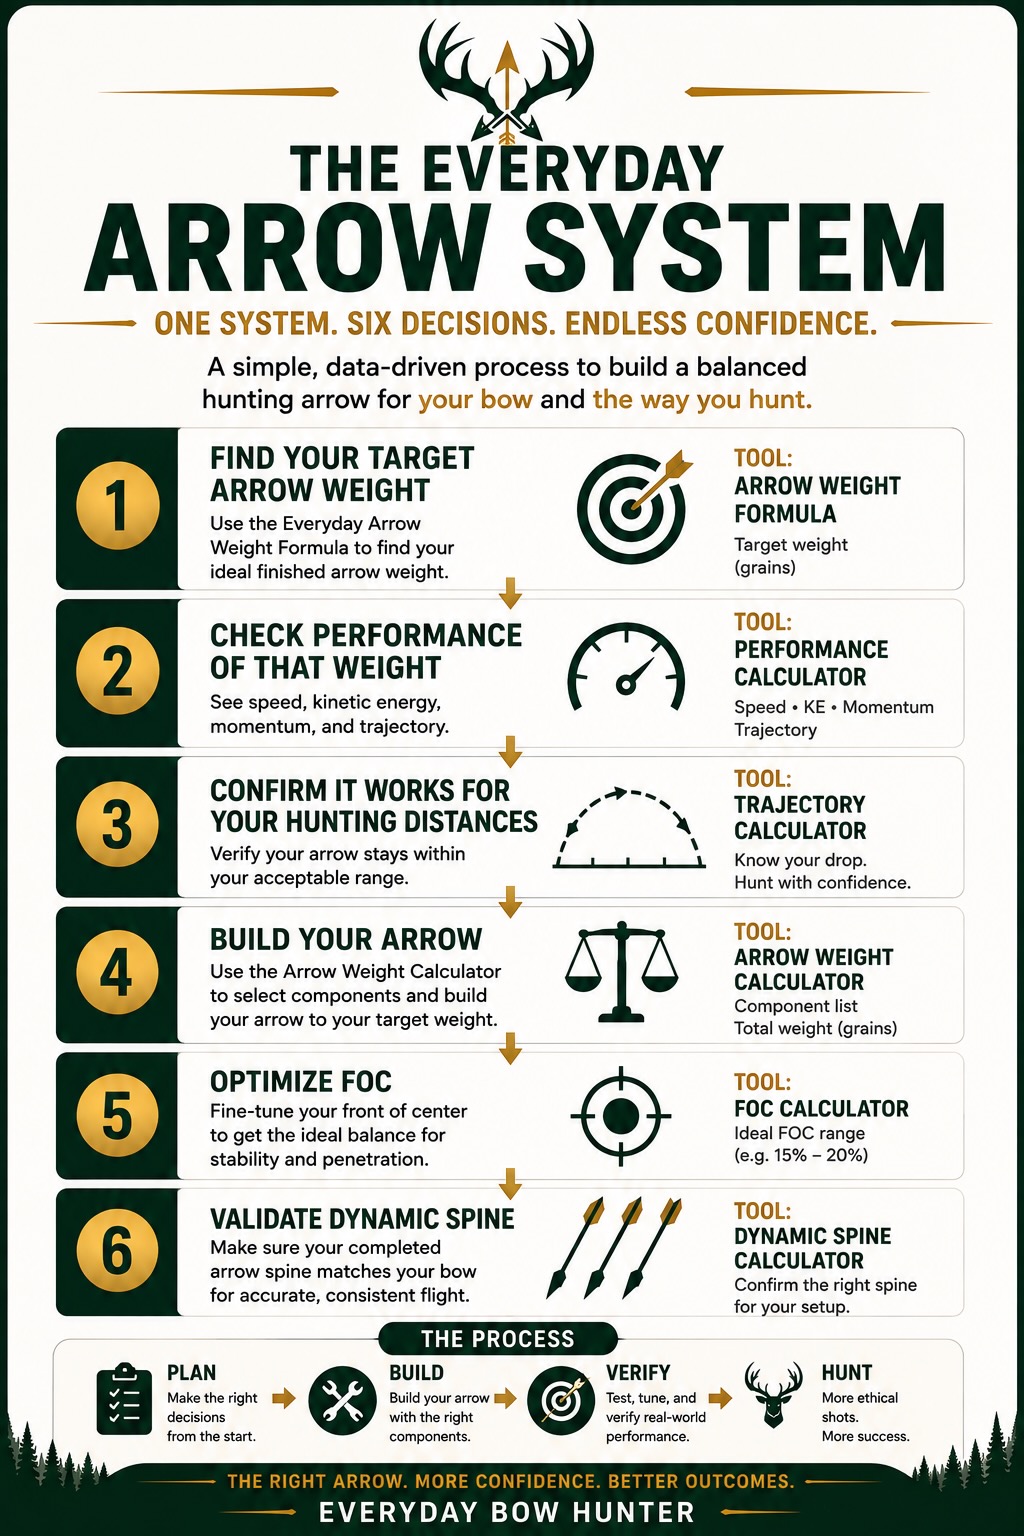
Trajectory does not stand alone. It is the Step 3 check that connects the target weight from Step 1 and the performance numbers from Step 2 to your real sight plan. It tells you whether the complete setup is practical before you move on to component choices, FOC, and final dynamic-spine validation.
- Find your target arrow weight. Start with the Everyday Arrow Weight Formula.
- Check performance at that weight. Use the Arrow Performance Calculator to see speed, kinetic energy, and momentum together.
- Confirm the path for your use. Use this calculator to check your selected zero, vertical window, rise, drop, and ranging-error margin.
- Build the arrow accurately. Select components that hit your target weight, then measure the finished arrow.
- Check FOC. Fine-tune balance without losing sight of the whole build.
- Validate dynamic spine. Use the Dynamic Spine Calculator to confirm the finished arrow still matches your bow and point weight.
How to Use This Calculator for TAC Setup
Total Archery Challenge and other distance courses are a good reason to understand your trajectory beyond normal hunting distance. The calculator lets you study your arrow’s path out to 100 yards so you can prepare your sight tape, understand your pin gaps, and see how a small rangefinding mistake grows as targets get farther away.
Start with the zero you actually use
There is not one “TAC zero” that fits every bow or sight. A 40-yard zero can make sense for some fixed-pin and slider setups, but it is not a default recommendation. Start with the zero your sight is built around, then use the calculator to see the rise and drop that follow.
Use it to plan your sight tape and pin gaps
Enter your chronographed speed, finished arrow weight, and sight height. Then study the output at the marks you will use on the course: 20, 30, 40, 50, 60, 80, and 100 yards. This helps you catch a bad assumption before you build a tape or rely on a gap you have not confirmed.
Compare range-error cost before the event
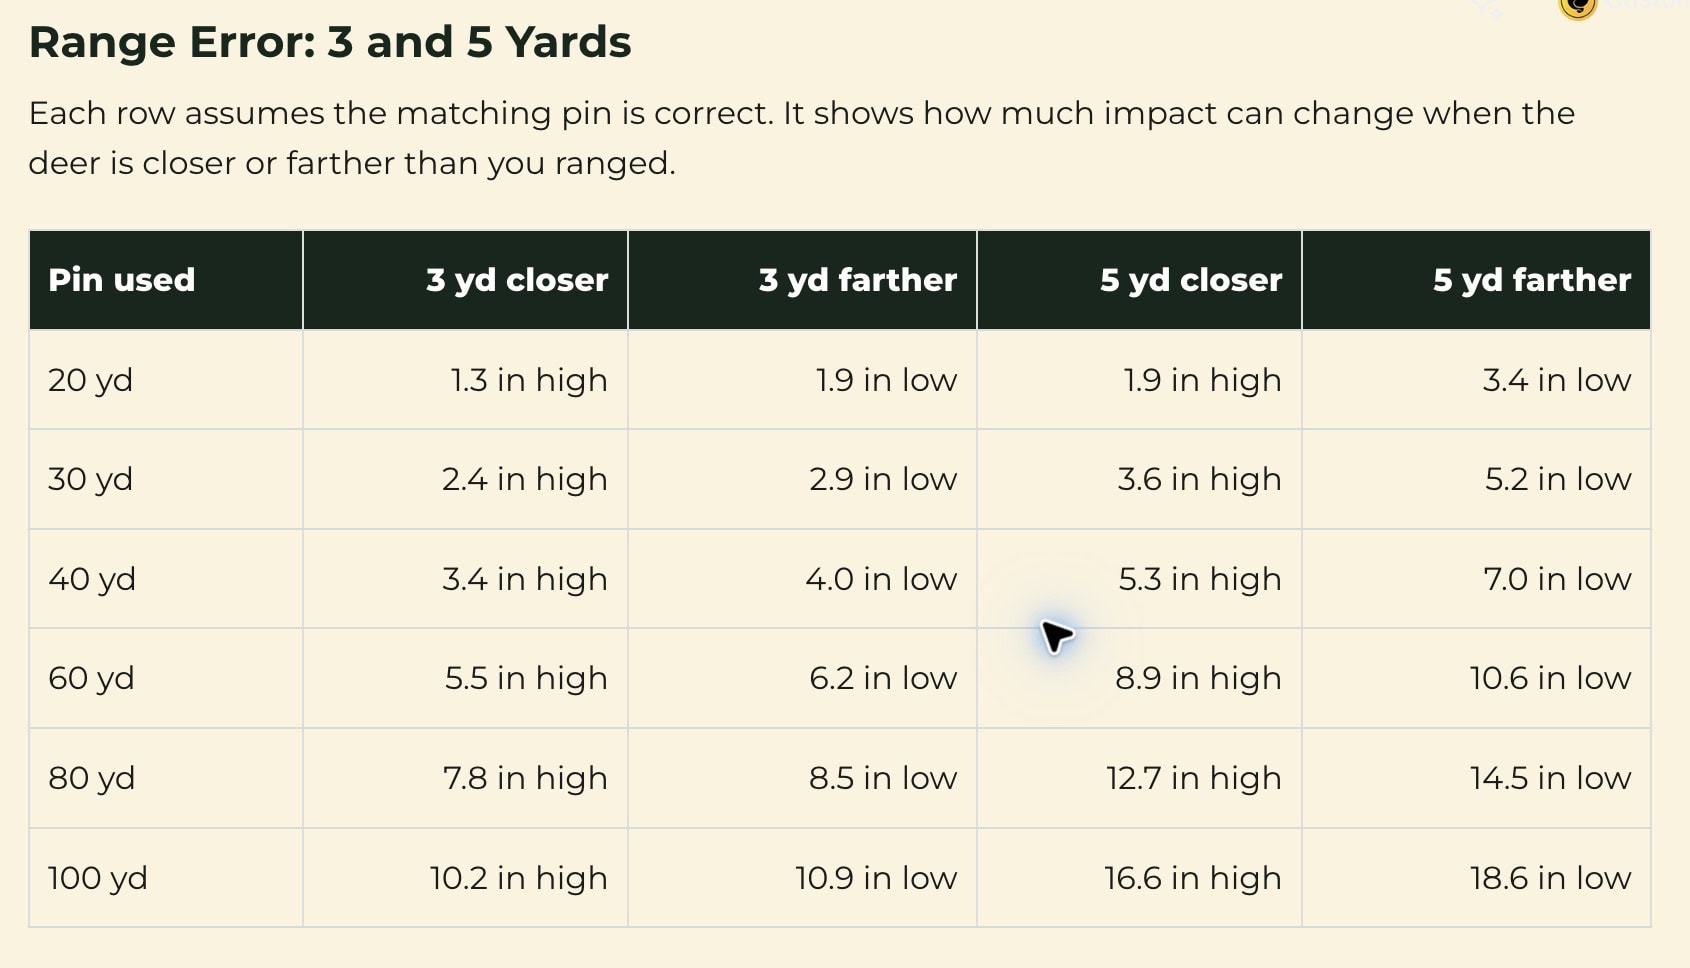
On a long 3D target, being three or five yards wrong matters more than it does at 20 yards. The range-error table makes that tradeoff visible. Use it to decide where you need more careful ranging, where a known gap is acceptable, and where you need to slow down and verify the number.
Then shoot every important mark
The calculator is the planning step. It does not replace shooting your actual arrow through the sight you will carry. Confirm the final tape or pins at real distance, especially at the farther marks where a small speed difference, a loose sight, or an incorrect peep-to-sight measurement can show up.
TAC setup checklist
- Chronograph the finished arrow, not a bare shaft or advertised bow speed.
- Use the zero you actually shoot—not a borrowed 40-yard zero.
- Run the calculator to 100 yards and inspect rise, drop, and 3- and 5-yard range errors.
- Build or select a tape from verified speed and verify it at several real distances.
- Practice your rangefinder routine, holdovers, and pin gaps before the course.
None of this makes 100 yards a hunting recommendation. A course shot is a planned practice shot at a known target. A live-animal shot adds judgment, movement, angle, wind, and consequences. Keep those decisions separate.
A Quick Weight-and-Trajectory Example
I ran three finished-arrow weights through the same bow setup, 25-yard zero, sight height, and Advanced Arrow Profile. The only main change was arrow weight and the speed that came with it.
- 375 grains: about +3.3 inches of maximum rise, with a continuous center-hold window from 5.0 to 30.5 yards.
- 490 grains: about +4.0 inches of maximum rise, with a continuous center-hold window from 5.0 to about 29.7 yards.
- 550 grains: about +4.5 inches of maximum rise, so the arrow leaves the top of the ±4-inch window before coming back inside.
The lighter arrow did not rise higher. It launched faster, so it needed less upward angle to reach the same 25-yard zero. The heavier arrow launched slower and needed a steeper angle. That is why arrow weight, speed, and zero must be considered together.
This does not mean lighter is always better. Weight also affects kinetic energy, momentum, noise, penetration, and tuning. In the Everyday Arrow System, this calculator answers one question: Does this arrow path fit my sight plan and hunting distances?
MY STANDARD RULE
Choose the zero and vertical window that fit the way you hunt. Then verify that plan with real arrows before you trust it in the field.
Bottom Line
A trajectory calculator should make your setup easier to understand, not tell you that one number fits everyone. Start with your actual arrow speed, use the zero you really run, choose the vertical room you are comfortable with, and see what the arrow does at the distances that matter.
My 20–25-yard / ±4-inch plan is a close-range starting point. Your best setup may be different, and this calculator is designed to show you that difference.
Frequently Asked Questions
Why can an arrow leave the window and then come back inside?
Your sight points slightly downward toward the arrow’s path. The arrow can rise above your upper limit, come back inside, cross the line of sight at your chosen zero, and later fall below the lower limit.
Is +4.0 inches still inside a ±4-inch window?
Yes. A displayed result of +4.0 or -4.0 is on the boundary and still counts as inside. The displayed path must move beyond the limit before it is marked outside.
Why can a heavier arrow rise higher before the same zero?
A slower arrow needs a steeper launch angle to reach the same zero. That steeper angle can create more rise before the arrow comes back to your line of sight.
Does the best practical zero replace the zero I selected?
No. Your selected zero remains the main plan. The best practical zero is a comparison that shows whether another normal 5-yard sight-in could create a longer continuous center-hold window.
Can I use the 100-yard result as my final sight tape?
Use it to plan and compare. Then chronograph the finished arrow and shoot every important mark. Small differences in real speed, drag, sight height, and bow setup grow as distance increases.
How accurate is the downrange-speed model?
Against a controlled radar-tested reference set, the standard model was generally within about ±4 fps at 60 yards and ±8 fps at 100 yards. That is useful for planning, but your real arrow and conditions can differ. Review the test methods and radar results, then verify your own arrow on the range.
Important Notes
Trajectory results are estimates. Broadhead design, arrow drag, bow tune, air density, sight height, release execution, and rangefinding all affect real impact. Use the model to make a plan, then verify that plan with the arrows and broadheads you will hunt with.
For a deeper look at the weight-and-speed tradeoff, read Heavy or Light Arrows? How to Choose the Right Hunting Arrow Weight and What Is the Best Arrow Speed for Hunting?.
Next Steps in the Everyday Arrow System
Want the guided path? Start with the Hunting Arrow Planner and carry one build through arrow length, target weight, performance, components, FOC, and dynamic spine.
Need the full process? Return to the Everyday Arrow System.
Still choosing a target weight? Start with the Everyday Arrow Weight Formula.
Need to compare speed, kinetic energy, and momentum? Use the Arrow Performance Calculator.
Ready to plan every component? Use the Arrow Weight Calculator.
Checking the finished plan? Use the Dynamic Spine Calculator before you build the full batch.
Want to see exactly what I’m carrying this season? Check out my Personal Bowhunting Gear List for 2026