
One reason I decided to write this guide was what happened after my brother and one of his friends bought new bow sights.
My brother knew the first, second, and third axes needed to be checked. His friend did not, and he had not leveled any of the axes on his sight. He was an excellent practice shooter, but he had missed deer or made shots from elevated positions that were not as good as he knew he could make.
His sight had never been leveled. His normal practice shooting was strong, but the trouble showed up when he was shooting from elevated positions. That made the sight alignment the most likely problem, with the third axis being the most likely place the error showed up.
Once he understood the issue, he took the bow to a shop and had the first, second, and third axes checked and leveled. It made a noticeable difference in his shooting.
That experience is why I do not treat sight leveling as a fussy bench task. Your sight can look level while the bow is upright and still give you a bad left-or-right reference on a steep uphill or downhill shot. A third-axis error may stay hidden until you raise or lower the bow, which is exactly when you need the bubble to give you an honest reference.
Leveling the sight does not make an arrow fly correctly by itself. It does not replace bow tuning, a proper sight-in, repeatable form, torque control, or shooting verification. It gives you a reliable level reference and removes one equipment variable that can create left-or-right error.
In this guide, I will show you how to check the first, second, and third axes, which tools make the job easier, and why the final third-axis check needs to account for how you hold the bow at full draw.
Important: Not every sight gives the user separate adjustments for all three axes. Some single-pin and multi-pin sights have fixed axes or limited adjustment. Check the manufacturer’s instructions for your exact sight before loosening hardware or trying to correct an axis the sight was not designed to adjust.
If you are still choosing or changing the scope housing, lens, peep, or mounting hardware, use my bow sight scope customization guide first. Build the complete sight picture, then come back here and level the finished system.
- Why Bow Sight Leveling Matters
- Understanding the Three Axes of a Bow Sight
- Tools You’ll Need for Leveling Your Bow Sight
- Step-by-Step: How to Level the First Axis
- Step-by-Step: How to Level the Second Axis
- Step-by-Step: How to Level the Third Axis (Shop Method)
- Field-Expedient Method: Leveling the Third Axis Without a Vise or Kit
- "Shooting in” the Third Axis
- What If Your Sight Doesn’t Have Axis Adjustments?
- Final Tips and Takeaways
- Your Next Steps
Why Bow Sight Leveling Matters
The bubble in your sight is useful only if the sight housing and its adjustable axes are aligned. Centering a bubble that is giving you the wrong reference can make a consistent setup look correct when it is not.
With the bow upright, the second axis helps establish whether the sight housing and pins are level from side to side. When the bow is raised or lowered for an angled shot, the third axis helps the bubble remain a useful reference as the sight rotates with the bow. The first axis matters most on sights with vertical travel because it helps keep that travel moving straight up and down.
A properly checked sight removes one possible source of horizontal error. You still need to tune the bow, sight it in, control torque, and verify the result by shooting. If you want a deeper explanation of the errors each axis can create, read why bow sight leveling matters.
Understanding the Three Axes of a Bow Sight
Before we get into the how-to, let’s quickly cover what each axis controls on your bow sight:
- First Axis (Yaw Axis): This axis runs left-to-right, parallel to the ground (imagine an invisible line through your sight left-to-right). Adjusting the first axis tilts your sight housing forward or backward (like tipping a bucket). It ensures the sight’s vertical post or slider is truly vertical.
- If the first axis is off, your sight’s elevation adjustments might drift left/right as you move your sight up and down.
- Many sights come with this axis preset from the factory, especially multi-pin hunting sights. On single-pin slider sights, you often can (and should) adjust the first axis so the sight housing face is perfectly vertical (parallel to your bowstring).
- Second Axis (Tilt/Pitch Axis): The second axis runs through the center of your sight front-to-back (imagine a rod pointing at your eye through the sight).
- Adjusting the second axis tilts the sight left or right (like the hands of a clock rotating around the face). This controls whether your sight’s bubble level reads true when the bow is upright.
- Why it matters: If the second axis isn’t level, you’ll unknowingly cant (tilt) your bow to center the bubble, causing your pins to slant diagonally.
- At close range, you might not notice, but at longer ranges, your arrows will impact left or right of center. This is the most important axis for most shooting; if it’s off, your shots will drift as distance increases.
- Third Axis (Roll Axis): The third axis runs top-to-bottom through the sight, like a door hinge that lets the sight pivot toward or away from you.
- This comes into play for uphill or downhill shots. When you tilt your bow up or down, an unlevel third axis will make the bubble slide to one side even if your bow is actually vertical. That tricks you into tilting the bow, resulting in a left or right miss on steep angles.
- On flat ground, the third axis won’t affect aim if the second axis is level, but on a tree stand or mountain slope, it absolutely matters.
- In fact, at steep 45° angles and longer distances (20+ yards), a mis-set third axis can cause significant horizontal error, in some cases nearly a foot off at 50 yards!
Understanding these axes, you can see why leveling all three is essential for hitting where you aim, whether you’re in a tree stand or out west stalking elk in rugged terrain. Now, let’s get into the tools and steps to get it done.
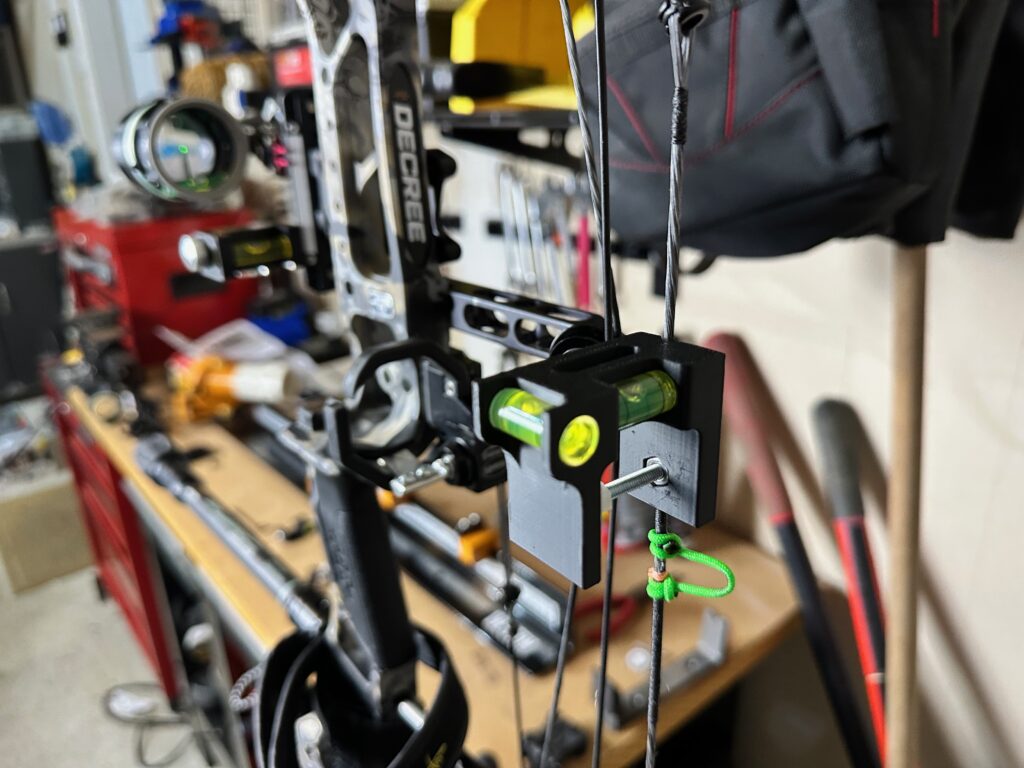
Tools You’ll Need for Leveling Your Bow Sight
You can check sight axes with simple levels and a plumb line, but a solid bench setup makes the job faster and more repeatable. These are the tools I now use for my own bows.
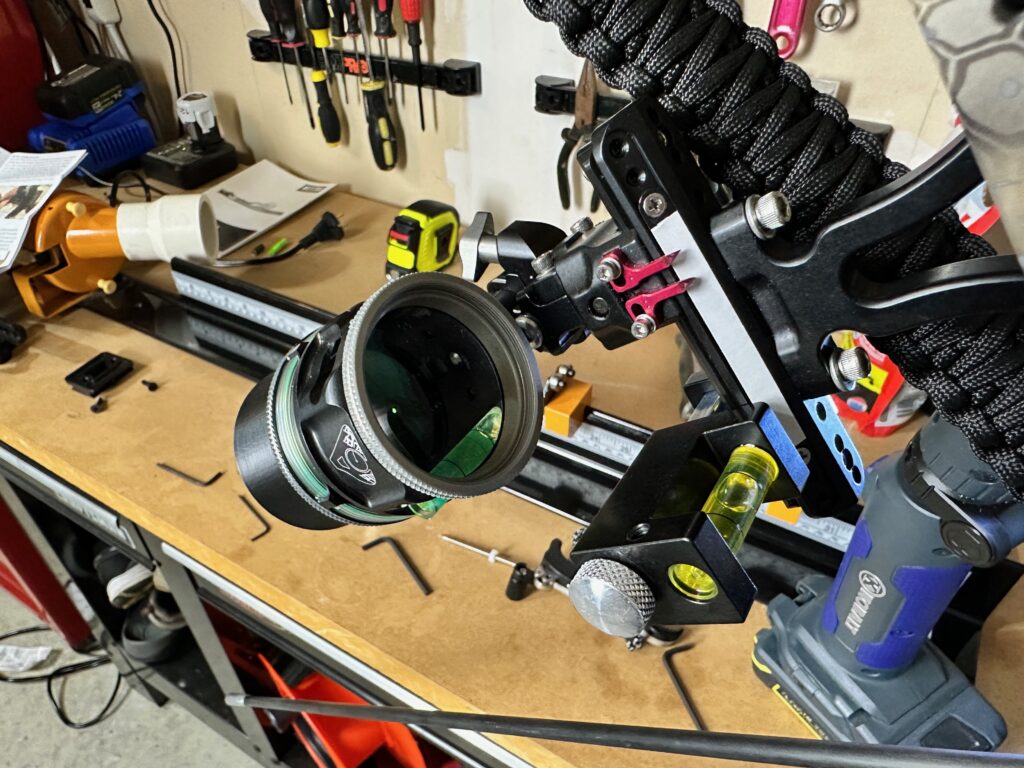
- OMP Versa-Cradle Bow Vise: I upgraded from the budget vise that used to be on this page. It costs more, but the build quality is much better than most vises I have tried. It holds my bow securely, lets me lock it in the right position, and gives me a stable platform for precise sight work.
- OMP Versa-Cradle wide version: I use the wide version with the vise for the wider limbs found on many current compound bows. Select that version if your bow needs the extra limb support.
- OMP Bow Sight Axis Leveler: I attach the sight to this tool and level it before mounting it on the bow. That gives me a clean starting point for the sight itself before I introduce the bow, grip, or full-draw torque into the process.
- Hamskea GenPro2 Third Axis Level: I still use this to verify the mounted sight on the bow and to check the third axis through angled positions.
- SPG Bow Level Kit: This gives me another reference for keeping the bowstring and bow plumb while I work.
- OMP Tech Starter Tool Kit: I use this for the small fasteners and bow-specific adjustments involved in sight setup and regular maintenance.
- Plumb line: A piece of string with a weight provides a true vertical reference and still works when you do not have the full bench setup available.
The OMP Axis Leveler lets me level the sight before it goes on the bow. I then mount the sight, secure the bow in the OMP vise, make the bow plumb, and verify the axes again. The final third-axis check still needs to account for how you hold the bow and the torque introduced at full draw.
These are affiliate links. I may earn a commission at no additional cost to you. I recommend these tools because I bought and use them.
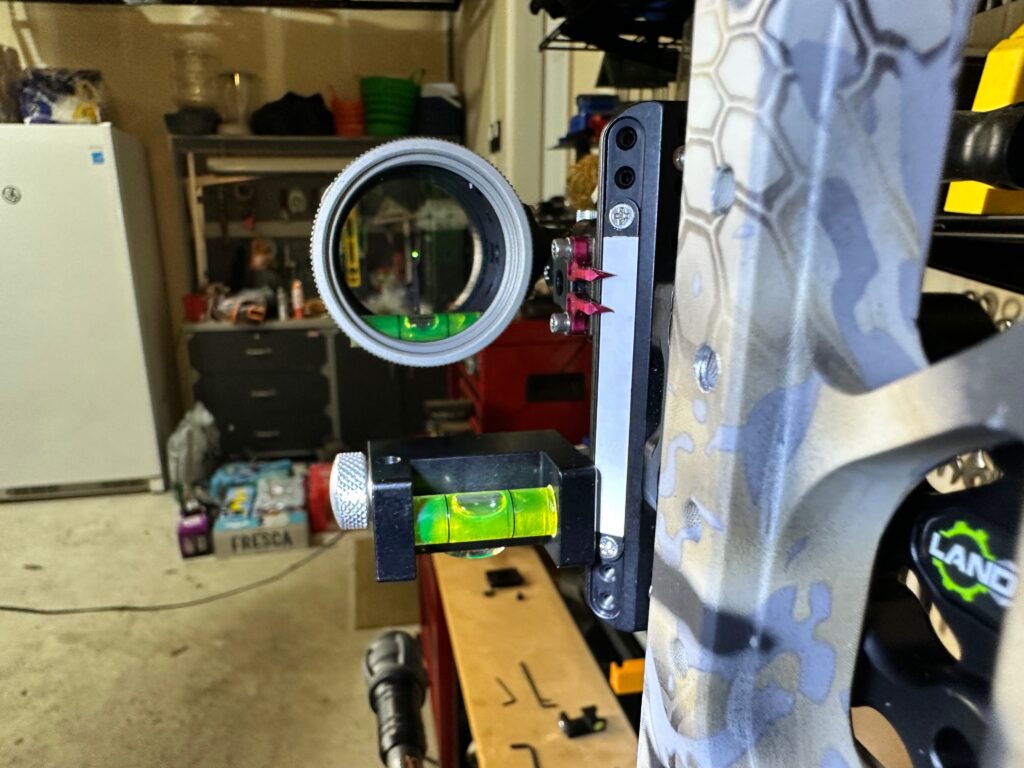
Step-by-Step: How to Level the First Axis
The first axis is usually set at the factory, but it’s wise to check it, especially on single-pin slider sights.
Here’s how I level the first axis:
1. Mount the Bow & Level It Vertically: Place your bow in a vise (or have a helper hold it steady). Attach a level to the bow’s riser or string and adjust the bow until it’s perfectly vertical (the bubble centered). This ensures the bow itself isn’t leaning at all. Lock the bow in position.
2. Level the Sight Housing (First Axis Adjustment): Most multi-pin sights don’t have a separate first axis adjustment, but single-pin movable sights often do. If your sight has a first-axis adjustment:
- Locate the first axis adjustment – it might be a screw or knob that lets the sight housing rotate forward or back (bottom-over-top rotation).
- Place a small level on top of the sight housing (make sure it sits flat and is parallel to the sight’s horizontal bar).
- Adjust the sight housing tilt until the level on the sight reads perfectly level (bubble centered). For example, on a scope-style sight with a threaded rod, you’d rotate the housing toward or away from you until its face is parallel to the bowstring (straight up-and-down).
- Tighten the first axis screws once the bubble is centered.
If your sight lacks a first-axis adjustment (common on a lot of bow sights), usually it’s already squared up. Just double-check that the sight’s vertical post appears parallel to your string. If it’s way off, you might need to shim the sight or your bow’s mounting block, but that’s rare for the first axis.
3. Verify: Re-check that the bow is still vertical and confirm the bubble on the sight housing (the one you adjusted) is still centered. Now your first axis is set – the sight is not leaning forward or back.
Tip: First axis issues mostly affect single-pin sights with vertical travel. If this axis isn’t correct, your sight’s elevation travel won’t be straight up-down. For multi-pin sights, the first axis is typically fixed by design, so you often won’t need to fuss with it.
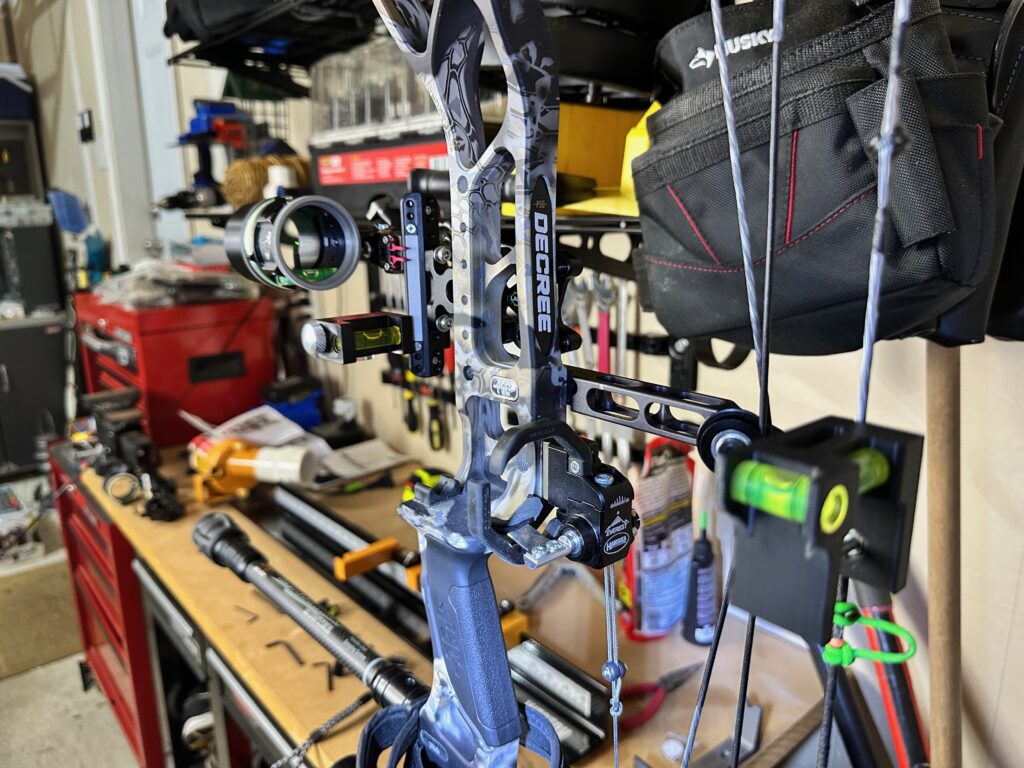
Step-by-Step: How to Level the Second Axis
Leveling the second axis means making sure the sight’s built-in bubble level is accurate when the bow is held straight up (perfectly level). This ensures you’re not unconsciously tilting your bow to get the bubble centered.
Here’s how to do it:
1. Set Bow Vertical Again: Your bow should still be clamped vertically from the first axis step. Double-check the bow’s level on the riser or string, and keep that bow plumb (upright).
2. Level the Sight Bar/Pins: Many sights have a vertical sight bar (the part that attaches to the bow) or a vertical pin track. Attach your small level perpendicular to the sight bar (so it’s aligned vertically along the bar).
If the bow is vertical, the sight bar should also read vertical. If it doesn’t, make sure nothing moved in your setup. (This step basically verifies that your bow and sight are both straight up and down.)
3. Adjust the Second Axis: Now look at your sight’s bubble level (usually mounted in the sight housing at the bottom). If your bow and sight bar are perfectly vertical, that bubble should be centered. If it isn’t:
- Find the 2nd axis adjustment screws on your sight. These typically let you tilt the sight housing left or right independently of the mount.
- Loosen the screws slightly and rotate the sight housing left or right until the sight’s bubble level is perfectly centered.
- Tighten the screws carefully without shifting the level (sometimes easier said than done).
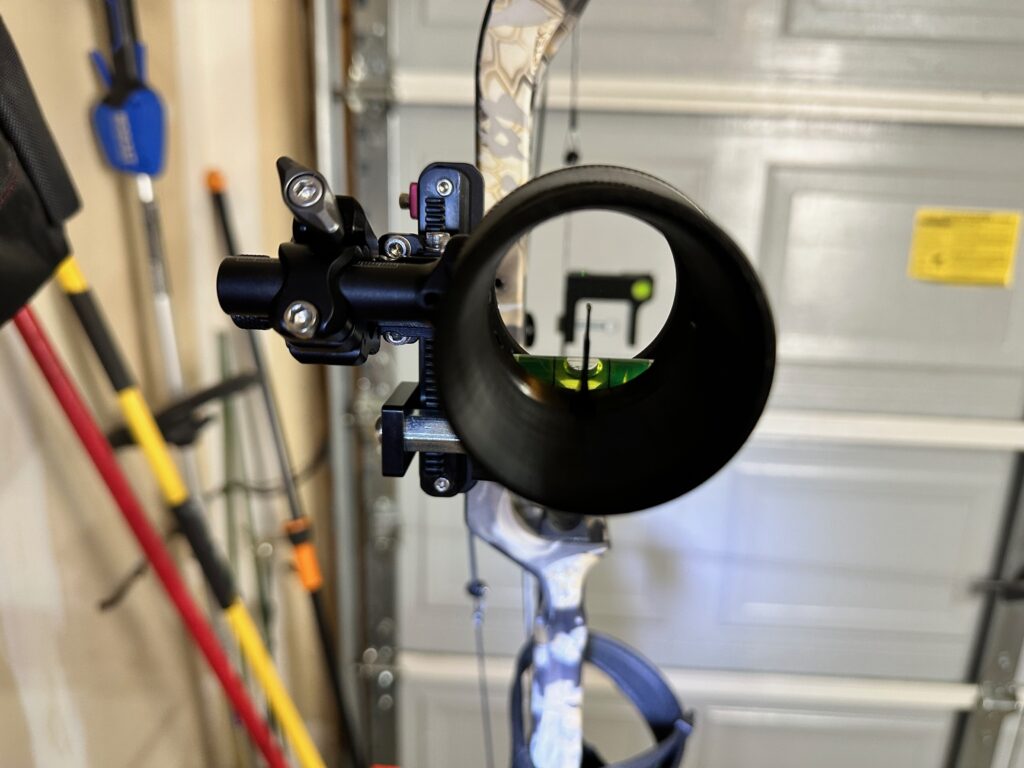
On some hunting sights that don’t have a second-axis adjustment, you can achieve the same effect by shimming the sight. For example, placing a thin piece of aluminum can or washer under one side of the sight mount where it attaches to the bow can tilt the whole sight just enough to level the bubble.
4. Double-Check Everything: Make sure the bow is still vertical and that the sight’s bubble stays centered. Your second axis is now level. This means when you hold your bow so that bubble is centered, your bow is truly vertical, with no unwanted cant.
Why is this so important? If the second axis is off, you might think your bow is level (because you centered the bubble), but the bow could actually be tilted. This leads to the same effect as canting your bow – arrows hitting left or right, especially as you shoot farther out. With a correct second axis, your pins will line up in a straight vertical line, and your left-right impact will stay true as distance increases.
Step-by-Step: How to Level the Third Axis (Shop Method)
The third axis is the trickiest, but crucial for uphill/downhill shots. Leveling the third axis means adjusting the sight so that when you tilt the bow up or down, the bubble level remains true.
Here’s the method I use in my workshop:
1. Second Axis First: Make sure you’ve done the second axis before this! The third axis adjustment won’t be correct if the second axis is off.
2. Simulate an Uphill/Downhill Shot: With your bow still in the vise, tilt the bow forward about 45° as if aiming downhill. (You can also tilt upward to simulate uphill – ultimately, you should check both.)
As you tilt, keep the bow’s riser level left-to-right. An easy way is to watch the level on your riser or string: as you tilt the bow forward, keep that riser level’s bubble centered. This ensures you’re only tilting forward, not canting sideways.
3. Watch the Sight’s Bubble: As the bow is angled, look at your sight’s built-in bubble. Ideally, it should remain centered while the bow is tilted. If the bubble runs off to one side, your third axis is not correct. For example, you tilt the bow down, and suddenly the bubble drifts right. This means your sight is tipping like a door, out of alignment.
4. Adjust the Third Axis: Most high-end sights have a third axis adjustment (often a screw near the sight housing that lets it pivot in/out).
- Loosen the third axis adjustment screws.
- Pivot the sight toward or away from you (the sight housing will hinge up or down relative to the mount) until the bubble is centered again while the bow is still tilted.
- This often takes a few tries: adjust a bit, re-center the bow’s riser level, check the sight bubble, and repeat until the sight’s bubble stays centered through the entire tilt.
5. Lock It Down: Once the bubble stays centered for both level and angled positions, tighten the third axis screws firmly.
6. Test Both Angles: Check on a steep uphill angle as well, tilt the bow upward (45° toward the ceiling), and ensure the bubble stays centered. If not, tweak the third axis until it behaves at both uphill and downhill angles.
Your third axis is now leveled. This means whether you take a shot from a tree stand down at a deer or uphill at a mountain goat, your sight’s bubble will give you a true reading. You won’t be subconsciously tilting the bow and causing a miss to the left or right because of a lying bubble.
Tip: In my experience, it’s good to verify the third axis at full draw if possible. Drawing the bow can introduce slight torque in the riser that might affect the level. If you have a helper, you can draw your bow (with an arrow safely!) and have them check if the bubble stays centered when you bend at the waist for an uphill/downhill aim. This is a “next level” check, but it can fine-tune your third axis even more.
🔧 My Bow Sight Leveling Setup
- Bow vise: OMP Versa-Cradle Bow Vise
- Wide-limb attachment: OMP Versa-Cradle Wide Version
- Bench sight leveler: OMP Bow Sight Axis Leveler
- Mounted-sight verification: Hamskea GenPro2 Third Axis Level
- Bow tools: OMP Tech Starter Tool Kit
Field-Expedient Method: Leveling the Third Axis Without a Vise or Kit
What if you’re already out in the woods or don’t have a fancy vise and level kit? Don’t worry, you can still adjust (or at least check) your third axis with some DIY methods. Here are a couple of field-expedient methods I recommend:
- Use a Plumb Line and a Steep Hill: Find a spot where you can safely draw your bow at an angle (for example, stand at the base of a hill and pick a small target uphill, or vice versa). Hang a plumb line (a piece of string with a weight) from a tree branch or some high point so it hangs straight down.
- You can also aim your bow down at the base of a doorway where the vertical part of the frame is level (check to confirm) as an alternative method. I’ve done this at our hunting camp when I didn’t have anything else on hand (after dropping my bow).
- Nock an arrow (for reference) or use the vertical edge of your sight housing/pins. Now draw your bow (carefully! Make sure it’s safe to aim). Line up your sight’s vertical pins with the plumb line while aiming at a steep angle.
- Next: Check your bubble
- If the bubble is off to one side when your pins are aligned with the plumb line, your third axis needs adjustment.
- Carefully let down, then use your Allen wrench to tweak the third axis screw on your sight a little in the needed direction (e.g., if bubble drifts right, tilt sight accordingly).
- Repeat the draw and aim, aligning with the plumb line, until the bubble stays centered when your pins align vertically.
This method basically uses gravity (the plumb line) as your level reference instead of a vise. It’s surprisingly effective for both multi-pin sights (use the pin stack as the vertical reference) and single-pin sights (use the sight housing edge or even your arrow as a reference).

“Shooting in” the Third Axis
This is a trial-and-error approach. If you suspect your third axis is off and you have room to shoot:
- 1. On flat ground, shoot a group at a distant target (say 40-50 yards) and adjust your sight so you’re hitting center.
- 2. Next, find a steep downhill shot to the target (from a hill or treestand) at the same horizontal distance. Shoot a group. If those arrows hit to the left or right of center (consistently), that’s a sign of third-axis error.
- 3. Adjust the third axis on your sight a small amount in the opposite direction of your miss. (E.g., if downhill shots hit right, your bubble was lying and you were canting right – so adjust the sight accordingly to bring the bubble to center).
- 4. Repeat with an uphill shot if possible, or keep fine-tuning until your uphill/downhill hits line up with your flat ground hits.
This method takes some ammo and is best done with broadhead-tipped arrows only if you’re tuning for hunting (to replicate actual hunting shots). It’s basically a real-world confirmation that your third axis is correct by seeing actual impact points.
Note: Field methods require caution. Always ensure you have a safe backstop and you’re not drawing or shooting at extreme angles without checking your surroundings. If in doubt, wait to adjust your sight at home with proper tools. But it’s good to know you can do this in a pinch with just some string and patience.
What If Your Sight Doesn’t Have Axis Adjustments?
Some bow sights, especially entry-level or fixed models, don’t offer 1st, 2nd, or 3rd axis adjustments. That doesn’t mean you’re out of luck. Here’s what I recommend:
- 1st Axis (Mounting Bar Tilt)
- ➤ If your sight arm isn’t square to the riser, you might need to shim the bracket slightly using thin washers or spacers behind the mounting screws.
- ➤ Make sure your sight bar is level with the bowstring using a string level and bubble level combo.
- 2nd Axis (Scope Tilt Left to Right)
- ➤ If there’s no built-in adjustment, check if the sight ring can be loosened and rotated.
- ➤ Some sights allow small tweaks by loosening the scope housing screws and adjusting by hand. If not, you may be stuck with what the factory set.
- 3rd Axis (Tilt Toward or Away From You)
- ➤ If your sight doesn’t adjust here, your best option is to move the scope closer to the riser.
- ➤ A shorter extension reduces 3rd axis error at steep angles and can keep your shots from missing left or right when shooting uphill or downhill.
Bottom line: If you can’t level your sight, you’re introducing error, especially at steep angles. Either get the most out of your current setup or consider upgrading to a sight with full axis control if you’re serious about accuracy in all terrain.
Final Tips and Takeaways
- Leveling Applies to All Sights: Whether you shoot a single-pin slider or a fixed multi-pin sight, the principles of leveling are the same.
- Single-pin sights often have more axis adjustments (since they’re made for precision at multiple distances), whereas multi-pin sights might only have 2nd and maybe 3rd axis adjustments. In either case, take the time to level what you can.
- Even if your sight doesn’t advertise a third-axis adjustment, you can often shim or slightly adjust how it mounts to get it close.
- Re-check After Changes: Whenever you change something on your bow (new sight, new rest, different arrows, etc.), it’s wise to re-check your sight leveling.
- Even small bumps while hiking can occasionally throw a level off. I make it a habit to verify my second and third axes at the start of each season and even in-season if my bow takes a hard hit.
- Steep Shots = Biggest Test: Remember, the whole reason we fuss with the third axis is for those steep shots.
- Practice shooting from a treestand or on a hillside before you hunt. That’s the best way to build confidence that your sight is truly dialed in.
- If you find your groups consistently off to one side on angled shots, revisit your third-axis adjustment.
- Accuracy and Confidence: A level sight gives you confidence. You can trust that when your bubble is centered and your pin is on the spot, the arrow will land where it should (barring wind or other factors).
- My brother completely transformed his long-range groups just by fixing a canted sight. It’s worth the effort.
In conclusion, leveling the 1st, 2nd, and 3rd axes on your bow sight might seem technical, but it’s a straightforward process you can do at home with the right tools, or even in the field with a bit of ingenuity. I promise, the first time you take a steep uphill shot at a nice buck and see that arrow hit true, you’ll be glad you took the time to get your sight axes leveled.
CONTINUE THE SHOOTING SYSTEM
Your Next Steps
A level sight removes one more source of error. The next step is to connect that setup work to a repeatable shooting process.
1. Understand Why Sight Leveling Matters
See how small leveling errors can move an arrow off line on angled shots.
2. Use the Everyday Bow Hunter Shooting System
Build bow fit, setup, practice, and shot execution into one process.
3. Build Your Summer Practice Plan
Turn the setup into useful practice before opening day.
Part of the Everyday Bow Hunter System
Want to see exactly what I’m carrying this season? Check out my Personal Bowhunting Gear List for 2026