

Arrow tuning can turn into a long project because every test leads to another test. I do not work that way. I want to know that the arrow is safe, leaves the bow clean, groups with the rest of my arrows, and puts my broadhead where I expect it to hit.
I change one thing at a time and make sure I can repeat the result. I use the maker’s spine mark on a good shaft when I trust its process. If the finished arrows group and the broadheads hit with my field points, I leave them alone. This guide will help you make that call and work from a basic safety check to the broadhead you plan to hunt with.
Use This Tuning Order and Know When to Stop
- Confirm that the arrows and bow are safe.
- Check vane clearance.
- Paper tune a new or changed setup. You can also use paper to check an existing tune.
- Build and test the finished arrows from the maker’s spine mark when you trust it.
- Use bare-shaft or nock tuning when the launch or one arrow gives you a reason.
- Confirm your field-point groups.
- Shoot the broadheads and check the full hunting setup.
What Each Arrow-Tuning Test Tells You
- Paper tuning: How the arrow is leaving the bow at close range.
- Bare-shaft tuning: Whether the bow, arrow, and your repeatable form launch an arrow without the vanes correcting it.
- Nock tuning: Whether one shaft improves when it is rotated around its axis.
- Clearance testing: Whether the vanes contact the rest, cables, or riser.
- Broadhead tuning: Whether the complete hunting arrow groups with a matching-weight field point.
A clean paper tear at 6 feet tells you about the launch at 6 feet. I still want to see the field-point group and the broadhead at a distance I may shoot while hunting.
Tools I Would Use for the Job
- Paper-tuning stand
- Hamskea bow and arrow level
- Pine Ridge Allen-wrench set
- OMP FlightDeck Arrow Spinner & Square
- Bulldog Doghouse FP Archery Target for field-point practice and grouping
- BIGshot Pro Hunter 18 broadhead target
- Bohning Pro Class Complete Fletching Tool for lower-volume home building
- OMP Phoenix Fletching Jig for a more adjustable step-up system
- Last Chance Revolution Arrow Tuner for premium arrow, insert, and broadhead alignment work
- Coop’s Bowsmith Spine Tester Pro for circumferential spine alignment
My fletching-jig recommendation by workload
I used the Bohning Pro Class Complete Fletching Tool for a lot of my arrow work. It does a good job and costs less than a shop-style jig. I would buy it for a first setup or for someone who may fletch a dozen arrows or fewer each year.
I moved to the OMP Phoenix Fletching Jig because I wanted micro-adjustment, settings I could return to, and an easier way to switch between three and four vanes. I used it to build six 475-grain Tooth of the Arrow arrows for my friend Jevin, and all six came out clean and consistent. I have more time behind the Bohning, so I cannot give the Phoenix the same long-term judgment yet.
Spinner versus premium arrow tuner
The OMP FlightDeck Arrow Spinner & Square handles the work most home builders need. You can spin a shaft or finished arrow, square the ends, and clean inside the shaft before you glue the insert.
The Last Chance Revolution Arrow Tuner belongs in a serious home station or pro shop. Its dial indicator reads shaft straightness to .001 inch, and the tool helps square and align the shaft, insert, and broadhead. You still need a rotating spine tester if you want to measure changes around the shaft wall.
Last Chance calls the Revolution a first-of-its-kind, all-in-one arrow-tuning tool. The box includes the tuner, an arrow bubble level, a broadhead-tuner insert, and a diamond squaring bar. One station can handle the straightness, squaring, and broadhead-alignment checks.
Best for: The serious home builder who assembles several sets of arrows, tests multiple broadheads, or wants measurable .001-inch straightness and alignment feedback.
Skip it if: You build one small batch each year and need a basic spin check for the finished arrow. The OMP FlightDeck is the better value for that job.
Step 1: Confirm the Arrow Is Safe and the Bow Is Close
One bad shot is a poor reason to move the rest. Check the equipment first, then shoot enough arrows to see whether the problem repeats.
- Inspect each shaft for cracks, splinters, deep gouges, or impact damage.
- Confirm that each nock fits and has no cracks.
- Spin field points and broadheads to find wobble.
- Tighten the rest, sight, modules, and other hardware to maker specifications.
- Confirm the bow’s cam timing, center shot, nocking height, and rest timing are at least at their manufacturer starting positions.
- Use the shaft maker’s spine chart and the Dynamic Spine Calculator to make sure the arrow is in a reasonable range for the bow.
If you are new to bow setup, have a qualified shop complete the first timing and center-shot check. Tuning cannot make a damaged arrow safe or correct the wrong shaft spine.
Step 2: Check Vane Clearance Before Chasing Tears
A vane that clips the rest, cable, or riser can move the arrow and change the paper tear from one shot to the next. I check clearance before I start chasing the tear with rest adjustments.
- Put foot powder, lipstick, or another visible transfer material where contact may occur.
- Shoot one fletched arrow into a close target with a safe backstop.
- Inspect the rest, vanes, cables, and riser for marks.
- Correct contact by following the rest maker’s timing and vane-orientation instructions.
- Repeat until the arrow passes without contact.
A drop-away rest is designed to move the launcher out of the vane path, but poor timing or setup can still cause contact. A Whisker Biscuit is a full-contact rest and needs the vane arrangement specified for its openings and geometry.
Step 3: Paper Tune at Close Range
Paper shows how the arrow leaves the bow at close range. Start about 6 feet from the paper and place the target several feet behind it. Use the same grip, anchor, and release for each shot so your form does not become another moving part.
I do not start the whole tuning process again for every batch. I use paper after a bow change, an important arrow change, or a group that tells me to check the launch. If the setup has stayed the same and the arrows shoot well, a new test should answer a question instead of creating one.
- Shoot one fletched field-point arrow.
- Mark the tear and arrow number.
- Shoot two more times before changing anything.
- If the tears agree, make one small correction.
- Repeat three-shot confirmation after each adjustment.
A clean “bullet hole” is the goal. Start with nocking height or rest height for a high or low tear. A left or right tear can come from rest position, cam lean or shimming, hand torque, release execution, or dynamic spine. Your shooting hand and the bow’s cam design also change the proper correction.
For tear diagrams and the detailed adjustment process, use my complete paper-tuning guide.
Step 4: Decide Whether Bare-Shaft Tuning Is Worth Doing
A bare shaft has no vanes to correct its flight, so it exposes errors in bow tune, arrow match, and shooting form. I use that sensitivity when I need to diagnose a problem. A beginner can make the setup worse by adjusting the bow after each imperfect bare-shaft shot.
I start from the maker’s mark on a quality spine-aligned shaft when I trust its work. I fletch the arrows, check clearance, shoot field points, and finish with my hunting broadheads. I bring out a bare shaft when those finished arrows give me a problem to solve.
When I Would Bare-Shaft Tune
- I skip it for now: The shafts came spine-aligned from a maker I trust, the finished arrows group, and the broadheads hit with the field points.
- I use it to diagnose the setup: The bow will not give me the same launch or the finished group keeps changing.
- I nock-tune one outlier: One numbered arrow keeps leaving a good group.
- I stop: The field points and broadheads group together at my hunting distance.
If you have a reason to bare-shaft tune, get the bow close with the basic checks before you begin:
- Use a field point, never an unfletched broadhead.
- Start 6 to 10 yards from a large target.
- Shoot two or three fletched arrows, then one bare shaft.
- Compare the groups and the angle of the bare shaft in the target.
- Repeat before adjusting. One bad release is not a tuning result.
- Move back after the result is safe and repeatable.
If the bare shaft keeps separating while the fletched arrows group, check launch tune, form, and dynamic spine. Inspect and nock-tune one shaft when that shaft is the lone outlier.
Step 5: Nock-Tune an Individual Problem Arrow
Nock tuning can bring one problem shaft back into the group. I use it on that arrow before I move the bow and change the impact of every other arrow.
- Number the arrow.
- Mark its starting nock position.
- Shoot and record the result.
- Rotate the nock 90 degrees.
- Test the 90-, 180-, and 270-degree positions.
- Confirm the best orientation with repeat shots.
For a bare shaft with no manufacturer alignment mark, follow the full spine-alignment and index-vane guide. Once fletched, keep the index vane oriented for rest clearance.
Step 6: Confirm Field-Point Groups Before Broadheads
For normal training and field-point grouping, I use the Bulldog Doghouse FP. It is the best field-point target I have ever used. Mine takes a beating and keeps going. Bulldog sells the current model in its PLUS series and backs it with the company’s lifetime-warranty program.
The Doghouse FP is a field-point target. Keep broadheads out of it. I switch to the BIGshot Pro Hunter 18 when broadheads enter the tuning process.
Move from the close tuning distance to 20 yards, then farther as your skill and range allow.
- Shoot numbered arrows in a changing order.
- Look for a group you can shoot again. Ignore one lucky shot.
- Set aside any arrow that keeps leaving the group.
- Inspect its nock, shaft, insert, point, vanes, and contact evidence.
- Do not move the sight until the group itself is consistent.
If point-weight testing is part of your plan, my field-point weight tuning guide explains what a heavier or lighter point can reveal about dynamic reaction.
Step 7: Broadhead Tune the Finished Hunting Arrow
Use a sharp broadhead or a dedicated practice head that matches the one you will carry. Pair it with a field point of the same marked weight and shoot both into a broadhead-rated target. I use the BIGshot Pro Hunter 18. Its Elasto-Flex foam handles field points and broadheads, which lets me shoot each one at a separate spot on the same target. Weigh the heads when you can because two packages marked 100 grains may not match on the scale.
- Spin every broadhead arrow. Correct visible wobble before shooting.
- At 20 yards, shoot a field-point group and a broadhead group into separate aiming spots.
- Repeat the result. Do not adjust from one shot.
- Make one small bow/rest correction at a time according to the bow and rest maker’s tuning procedure.
- Reshoot both groups after each change.
- Move to a longer distance after the groups agree at 20 yards.
A fixed blade can steer the front of the arrow, which exposes small problems in alignment, vane control, launch, and clearance. Get those parts right and a fixed blade can group with your field points.
Use the Pattern to Find the Problem
| What you see | Check first |
|---|---|
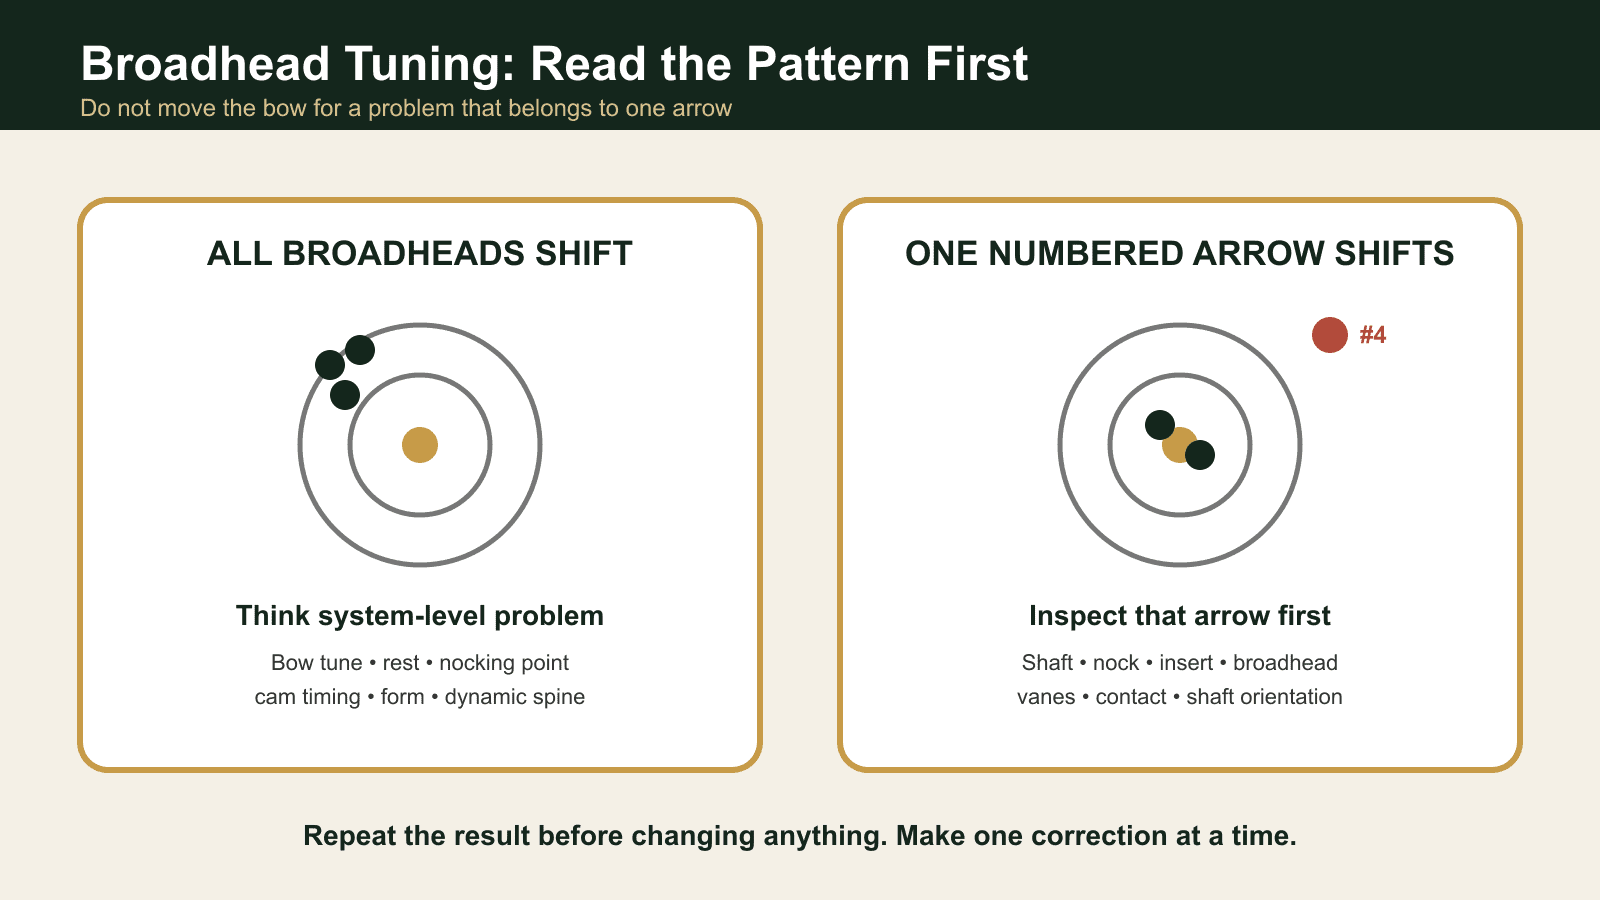
| All broadheads group together but away from field points | Bow tune, rest position, nocking height, cam timing, form, and dynamic spine |
| One broadhead arrow keeps leaving the group | That arrow’s shaft, nock, insert, broadhead alignment, vanes, contact, and indexing |
| Paper tears change from shot to shot | Form, loose equipment, vane contact, and rest timing |
| Every nock position gives the same large tear | Stop nock tuning; return to bow setup, contact, form, and arrow match |
| Field points group but broadheads scatter | Broadhead spin, vane steering, clearance, launch tune, and form |
Step 8: Prove the Setup You Will Hunt With
- Shoot the exact arrow, broadhead model, quiver setup, release, and clothing you will use.
- Use a safe range to shoot from the kneeling, seated, elevated, or awkward positions you may face while hunting.
- Confirm your hunting distances and sight marks.
- Record the numbered arrows that passed the hunting checks.
- Recheck after a hard impact, equipment change, new string/cables, or broadhead change.
A Beginner’s Stop Rule
Return to the last setting when an adjustment makes the group worse. If you cannot make the same basic shot three times, leave the equipment alone and work on your form or ask a good bow technician for help. Moving another screw will not clean up a release you cannot repeat.
Use the Everyday Arrow Planner to plan the shaft and components before you buy a full set. Build one arrow, work through the checks you need, and shoot the hunting broadhead. Finish the batch after that arrow gives you the same result more than once.
Technical Sources
- Easton Arrow Tuning and Maintenance Guide
- Iron Will: Make Broadheads Hit With Field Points
- Iron Will: Improve Broadhead Accuracy
- Victory Archery: Spine Consistency and Nock Tuning
- QAD UltraRest launcher-clearance description
Want to see exactly what I’m carrying this season? Check out my Personal Bowhunting Gear List for 2026