
From Combat Bracketing to Bowhunting Precision.
In Special Forces, I spent years clearing rooms and rooftops during high-threat missions. We ran hundreds of CQB operations where seconds made the difference between success and failure.
My M4 rifle was zeroed at 25 yards using an EOTech holographic sight, not just for convenience, but because it let me bracket targets from 5 to 100 yards with speed and confidence using specific hold-offs I had trained to use.
Later, I helped test the initial prototype of the Leupold Mark 4 CQ/T 1–3x14mm scope, which let me transition instantly between door-to-door fighting and longer-range rooftop engagements. That 25-yard zero became second nature. I trained for it. I trusted it. It worked.
When I retired and started bowhunting, I ran into a problem: my TBI made using a traditional multi-pin bow sight extremely difficult. My eyes couldn’t track cleanly from pin to pin. So I made the switch to a single-pin sight, and instinctively, I brought my old system with me.
At first, I zeroed at 20 yards, like most bowhunters. But after talking with some trusted guys in the field, I realized shifting to 25 yards gave me a more useful sighted path through my most common shot ranges. The arrow itself did not become flatter. The 25-yard zero changed how that curved path sat inside my aiming window. I tried it. I trained it. And it worked.
This system isn’t based on a theory. It’s built on real-world combat experience, hunting validation, and deliberate testing.
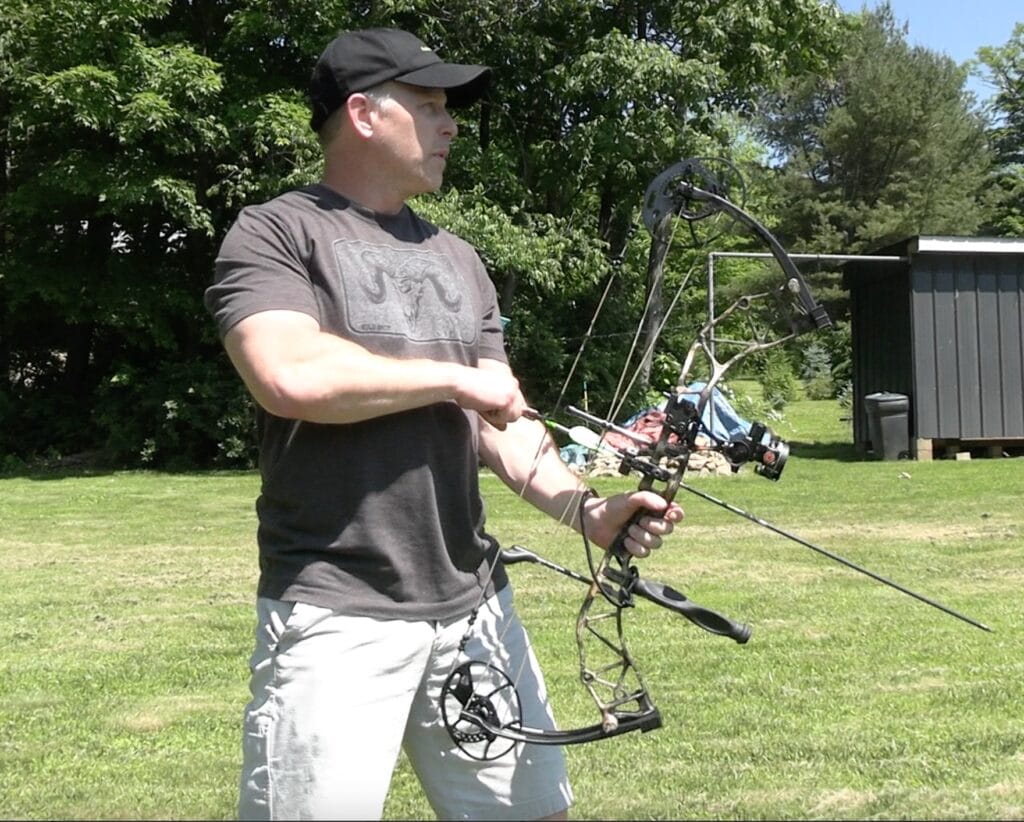
How to Train and Trust Your 25‑Yard Zero
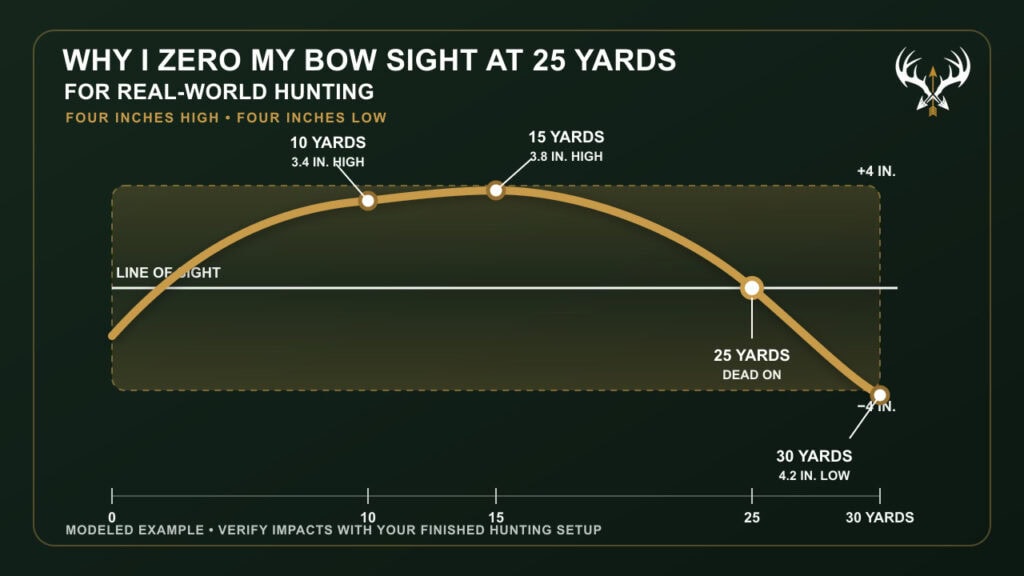
Once you’ve set your primary pin for a dead-on zero at 25 yards, it’s time to learn exactly what your arrow is doing at every hunting distance you might shoot. I developed my own eight-inch bracket through range testing and then proved it while hunting. I tested it from 10 through 30 yards; I did not originally test it all the way down to five. With my setup—a 245 fps launch speed and a 515-grain 4mm arrow—I learned that the arrow stayed inside an eight-inch high-to-low window across those distances. When I later entered the setup into the Advanced Arrow Profile, the model came back almost identical: about 3.4 inches high at 10 yards, 3.8 inches high at 15, 2.6 inches high at 20, dead on at 25, 1.5 inches low at 27, and about 4.2 inches low at 30. The model did not create the system. It confirmed and helped explain what I had already proven with my bow on the range and in the field.
The Hunting Arrow Trajectory Calculator can give you a useful starting model for that high-and-low path, flight time, and five-yard range errors. It applies my standard eight-inch vertical trajectory window—four inches high to four inches low—and recommends the practical 5-yard sight-in distance that keeps your arrow inside that window the farthest. It does not replace shooting your bow at each distance, but it shows you what to test before you step onto the range.
Why the Four-Inch Bracket Makes Sense for Whitetails
My eight-inch bracket started as a range and hunting standard. It also lines up with whitetail anatomy. Boone and Crockett reports that most whitetail bucks have a heart-and-lung cavity about eight to nine inches from top to bottom. Four inches high to four inches low gives me an eight-inch vertical trajectory window around the point I am aiming at.
That does not make every impact inside the bracket a guaranteed lethal hit. This is a trajectory standard—not a kill-zone promise or a measure of maximum ethical range. Shot angle, deer size, my own shooting error, and an animal moving before the arrow arrives can all reduce the usable margin. I still aim for the center of the lungs and verify the complete system with my hunting arrows and broadheads. Illinois hunter-education guidance also recommends the center of the lungs because it gives an archer the greatest margin around the aiming point.
Here’s how to dial it in:
- Shoot from key distances: Start at 5 yards and work back in 5‑yard increments to 35 yards. Record the exact high/low impact at each range compared to your 25‑yard zero.
- Factor in elevation: If you hunt from a treestand or elevated blind, repeat the drill from that height. Even with a flat‑shooting setup, close‑range shots from elevation can hit lower than you expect.
- Lock it into muscle memory: Keep running these shots until you know, without hesitation, exactly where your arrow will land. When that buck steps in at 30, you’ll already know the trained hold to use—or whether the better choice is to dial.
This is why I like the 25‑yard zero. It gives me a useful center-hold window without adjusting the sight, but only after I have confirmed the complete arrow path on the range and trained the holds I may need in the field.
What the Trajectory Model Says About My 25-Yard Zero
To check the eight-inch bracketing system I was already using, I ran my setup through the Hunting Arrow Trajectory Calculator: 245 fps, 515 grains, a 4mm arrow, a 1.75-inch sight height, standard offset hunting vanes, and the calculator’s low-profile mechanical broadhead category. The modeled curve nearly matched the range results I had already built the system around. I used the 4mm class preset of .235-inch outside diameter. The exact O.D. changes by shaft model and spine, so this is a refined estimate—not a replacement for the impacts I confirm on the range.
| Distance | 20-Yard Zero | 25-Yard Zero |
|---|---|---|
| 10 yards | 2.1 in. high | 3.4 in. high |
| 15 yards | 1.8 in. high | 3.8 in. high |
| 20 yards | Dead on | 2.6 in. high |
| 25 yards | 3.3 in. low | Dead on |
| 27 yards | 5.1 in. low | 1.5 in. low |
| 30 yards | 8.1 in. low | 4.2 in. low |
The table shows exactly what the 25-yard zero buys me. I accept a higher impact inside 20 yards, but I keep the arrow much closer to my aiming point from 25 through 30. Thirty yards is not where my arrow suddenly stops working. It is where the forgiving bracket begins to disappear and small range-estimation errors start creating much larger misses.
- 20-yard zero: Stays inside a four-inch-high or four-inch-low bracket to about 25.8 yards.
- 25-yard zero: Stays inside the same bracket to about 29.8 yards.
- Modeled optimum: About 25.5 yards for this setup and an eight-inch vertical window.
That does not make 25 yards the best zero for every hunter. It validates why it works for my speed, arrow, sight height, and normal shot window. The calculator gives me the model. Range work gives me the final holds I trust in the field.
Also, remember this: if your sight isn’t leveled properly, this entire system can fall apart, especially when shooting from a tree stand. Take the time to level your sight on all three axes.
Why I Use a Single-Pin Bow Sight

Faster vs. Slower Setups
Your bow speed will change how forgiving a 25‑yard zero feels. With my 245 fps, 515‑grain 4mm setup, the Advanced Arrow Profile models about 3.4 inches high at 10 yards and 4.2 inches low at 30. That uses most of an eight-inch vertical bracket, which is exactly why the system can work so well inside my effective range.
A faster setup reduces the size of those holds, but it does not erase the arc. In the calculator’s Standard Mode, a 280 fps arrow with the same 1.75-inch sight height models about 2.4 inches high at 10 yards and 3.2 inches low at 30 with a 25-yard zero.
If you are shooting a slower setup, expect a taller sighted arc and a shorter no-adjustment window. It can still be very huntable, but the exact high and low holds need to come from your own speed, sight height, arrow profile, and range testing.
The key is to verify your own numbers on the range. Don’t just take my chart and assume it matches your setup. Once you’ve confirmed your holds, you can trust them in the moment.
How It Works in the Field
Before I hunt, I range my lanes. I look at trees, terrain features, or even rocks and identify where 10, 20, 25, and 30 yards are from my stand or setup. Then I recheck to make sure my pin is set at 25 and forget it.
The whole point of a 25‑yard zero is to simplify your shot process under pressure. In the field, you’re not crunching numbers, you’re making a quick, confident shot based on a sight picture you’ve already burned into muscle memory.
Here’s how I run it with a single‑pin Axcel Landslyde:
- Inside 20 yards – The model puts my arrow about 3.4 inches high at 10 yards and 2.6 inches high at 20. I use the bracket I have trained, then make the close-range adjustment I have verified for the shot angle.
- 20 to 27 yards – This is my “perfect zone.” The model runs from about 2.6 inches high at 20 to 1.5 inches low at 27, so I can use the same trained center-hold bracket without touching the dial.
- Around 30 yards – The model puts me about 4.2 inches low. I use the hold I have verified on the range, or I dial when the shot window and time allow it.
- Beyond 30 yards – This is where I go to my sight tape. I’ll dial my Landslyde to the exact yardage, so I’m back to holding dead‑on. No mental math, no guessing the gap, just the same confident sight picture I’ve practiced.
For my setup, the 25‑yard zero gives me a longer trained center-hold window without touching the dial. Pairing it with a dial‑able single‑pin sight also lets me dial the exact distance when the shot or the opening demands more precision.
One last tip: if you’re hunting from a treestand and a deer comes in at rock‑throwing distance, remember your close‑range low impact adjustments from training.

Real-World Example: Fast Shot on a Ridge Buck
Back in 2014, I was 20 feet up in a stand when a shooter buck appeared, moving fast across the ridge. I had no time to range him. No time to touch my dial. My single pin was set at 25 yards. He stepped into my lane, quartering slightly. I held a touch high and released. Sixty yards later, he piled up.
That moment wasn’t luck, it was the result of a trained system. That’s what sold me completely on this method.
Just like my experience in combat, you don’t always have time to adjust your sight or check the range. In bow hunting, sometimes you only have a few seconds to draw and engage, and that’s why this system is perfect for me.
Why I Zero at 25 Yards Instead of 20
Most bowhunters are told to zero their single-pin sight at 20 yards. That’s the standard. But here’s the truth: most of my shots happen between 20 and 35 yards, and 25 sits right in the middle.
Zeroing at 25 yards does not flatten the arrow’s physical arc. It changes the line of sight through that arc. I accept more height inside 20 yards so the arrow stays inside my useful bracket farther past 25. That gives me real forgiveness where most of my shots happen without pretending the arrow flies flat.
It is a bracketing system and for me, I have used it for so long now that I barely think about it when doing it.
This Isn’t a Guess. It’s a Trained System.
Let’s be clear: I don’t just set my pin at 25 and hope for the best. I train this system hard. I shoot it flat. I shoot it from elevation. I write down the data.
The model gives me a starting expectation of about 3.8 inches high at 15 yards and 4.2 inches low at 30. My final holds come from shooting those distances with the finished setup. That level of certainty doesn’t come from guessing; it comes from reps. I treat it like any other precision shooting system. Because that’s what it is.
I practice it so much that when a deer steps into range, I already know what to do. No second-guessing. No sight fumbling. Just settle and shoot.
Who This Method Works Best For
If you hunt from a tree stand, still-hunt timber, or shoot inside 35 yards, this method simplifies everything. It’s ideal for:
- Mobile hunters who don’t want to adjust pins mid-draw
- Tree stand hunters who need fast shot decisions
- Ground hunters who keep things close
If you regularly shoot past 40 or 50 yards, you’ll probably still need your dial. But for most real-world bowhunters, a well-tested zero can extend the useful bracket where it matters most.
A Tip from Dan: Use Your Dial When the Window Is Fixed
My brother Dan pointed something out that’s worth sharing. If you’ve got a setup where the deer will only present a shot in one small window, like a single trail or tight gap, there’s no reason not to dial your sight to that exact yardage ahead of time.
You’re not guessing. You know where the shot will be. Dial it, confirm your tape, and you’ll have a perfect hold with no bracketing needed.
I still use that approach in a few stand setups where it makes sense.
What Type of Sight Is Best?
To run this system right, your sight needs to be reliable. You want a clean, uncluttered housing with a bright pin and a smooth elevation dial. Full axis leveling is a must if you’re hunting from uneven setups or changing terrain.
My personal setup? An Axcel Landslyde with a 4x lens and a sunshade. It’s built for field use. But even basic single pins can work, as long as they’re easy to see and fast to use.
I used an Apex Covert Pro Single-Pin Bow Sight for four years prior to making the switch. It’s not perfect, but it worked well for me when it counted.
My Current Single-Pin Setup and Why I Trust It

Final Thoughts
I’ve run five‑pin sights. I’ve dialed every shot with a single-pin slider. But nothing has simplified my hunting or improved my shot execution more than a 25‑yard zero.
With my 245 fps bow and 515‑grain 4mm hunting arrow, the model keeps the 25-yard zero inside a four-inch-high or four-inch-low bracket to about 29.8 yards. A 20-yard zero reaches only about 25.8 yards in that same bracket. I can still adjust instantly with my Axcel Landslyde if a buck hangs up past that. The beauty of it is not only in the math. It is in the muscle memory I build on the range, so the sight picture is already familiar when the moment comes.
This isn’t a gimmick. It’s a field‑proven system backed by real numbers, realistic gaps, and hunts in heavy cover, tight lanes, and short shot windows. If you hunt whitetails that move fast and give you seconds to shoot, the 25‑yard zero can change the way you hunt.
It changed mine.
CONTINUE THE SHOOTING SYSTEM
Your Next Steps
Choose the equipment, fit, and setup in the right order so the complete bow is easier to shoot consistently.
1. Why I Shoot a Single-Pin Sight
Understand the sight choice behind the zero.
2. See My Current Single-Pin Setup
Review the components and practical setup details.
3. See My Complete Whitetail Bow Setup
See the bow, sight, rest, arrows, broadheads, release, sling, and quiver I use together.
4. Follow the Shooting System
Connect sight settings to a repeatable shot process.
Part of the Everyday Bow Hunter System
Want to see exactly what I’m carrying this season? Check out my Personal Bowhunting Gear List for 2026