

THE EVERYDAY ARROW SYSTEM
A shaft can have the right brand name, spine number, weight, and reputation and still be the wrong starting point for your finished arrow. The shaft has to work with the insert or outsert, broadhead, nock, fletching, bow setup, and the way you hunt.
The better question is not, “Which shaft is best?” It is, “Which complete component system fits my bow, my setup, and the way I hunt?” Start with compatibility. Count every grain. Then study what the complete build does to flight.
I say it this way: Your bow doesn’t kill the deer. The arrow does. That does not mean an expensive shaft or one straightness grade guarantees an ethical result. It means I take the complete arrow seriously, build one test arrow, and make the finished arrow earn my trust through measurements and tuning.
Why Hunting Arrow Components Must Work as a System
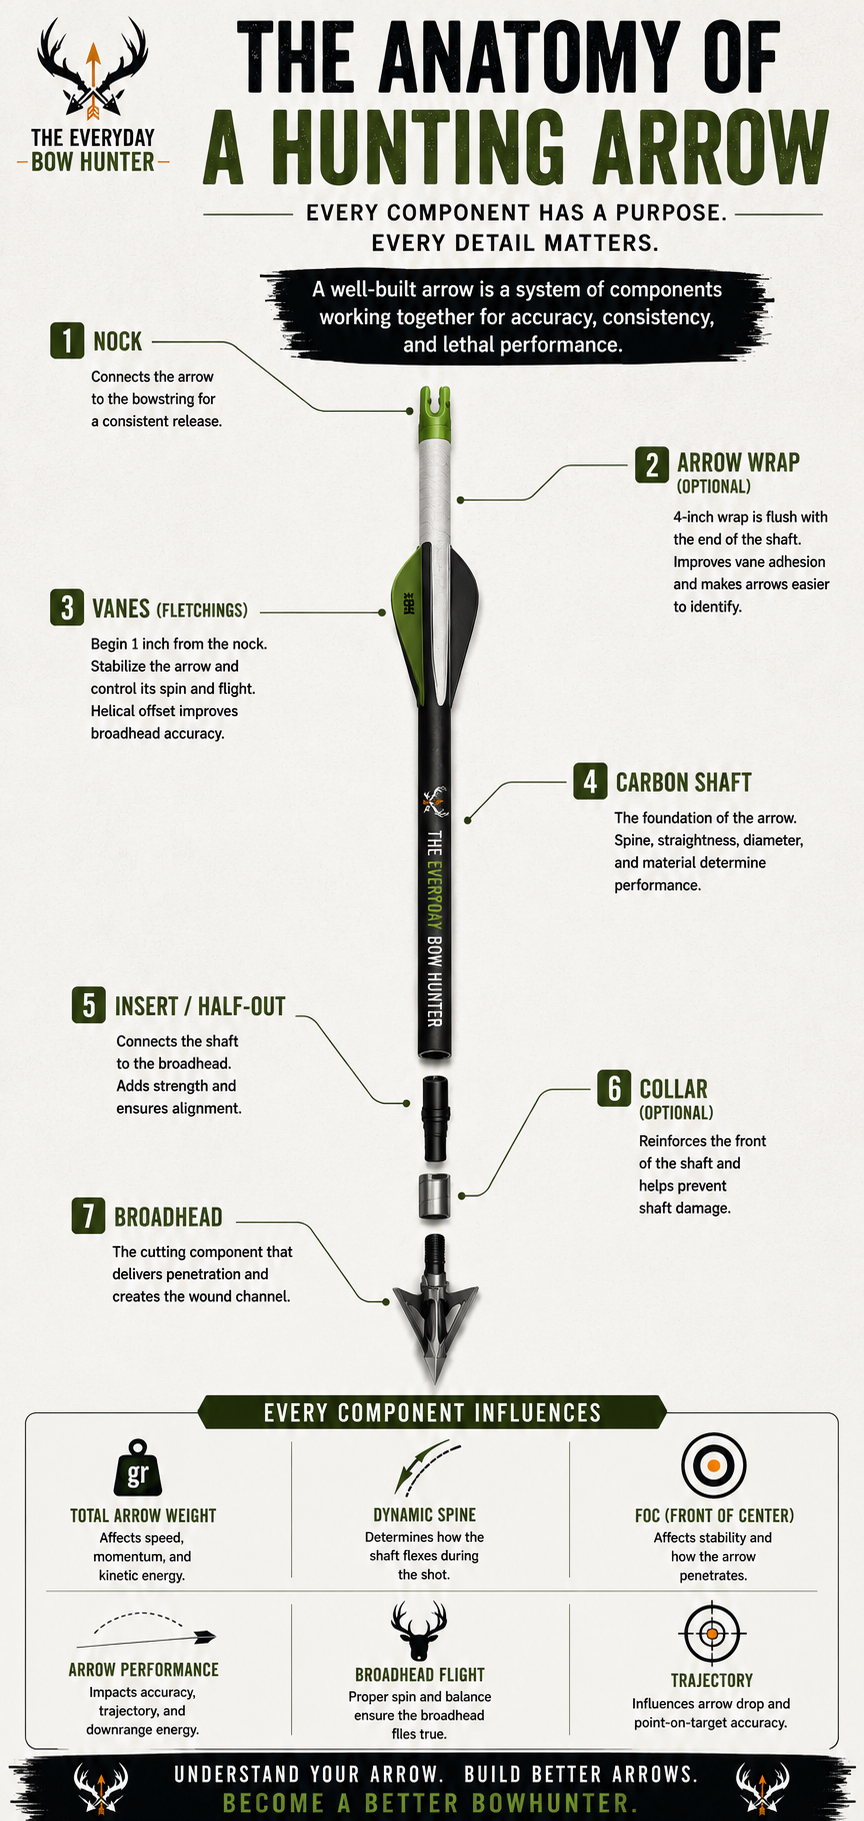
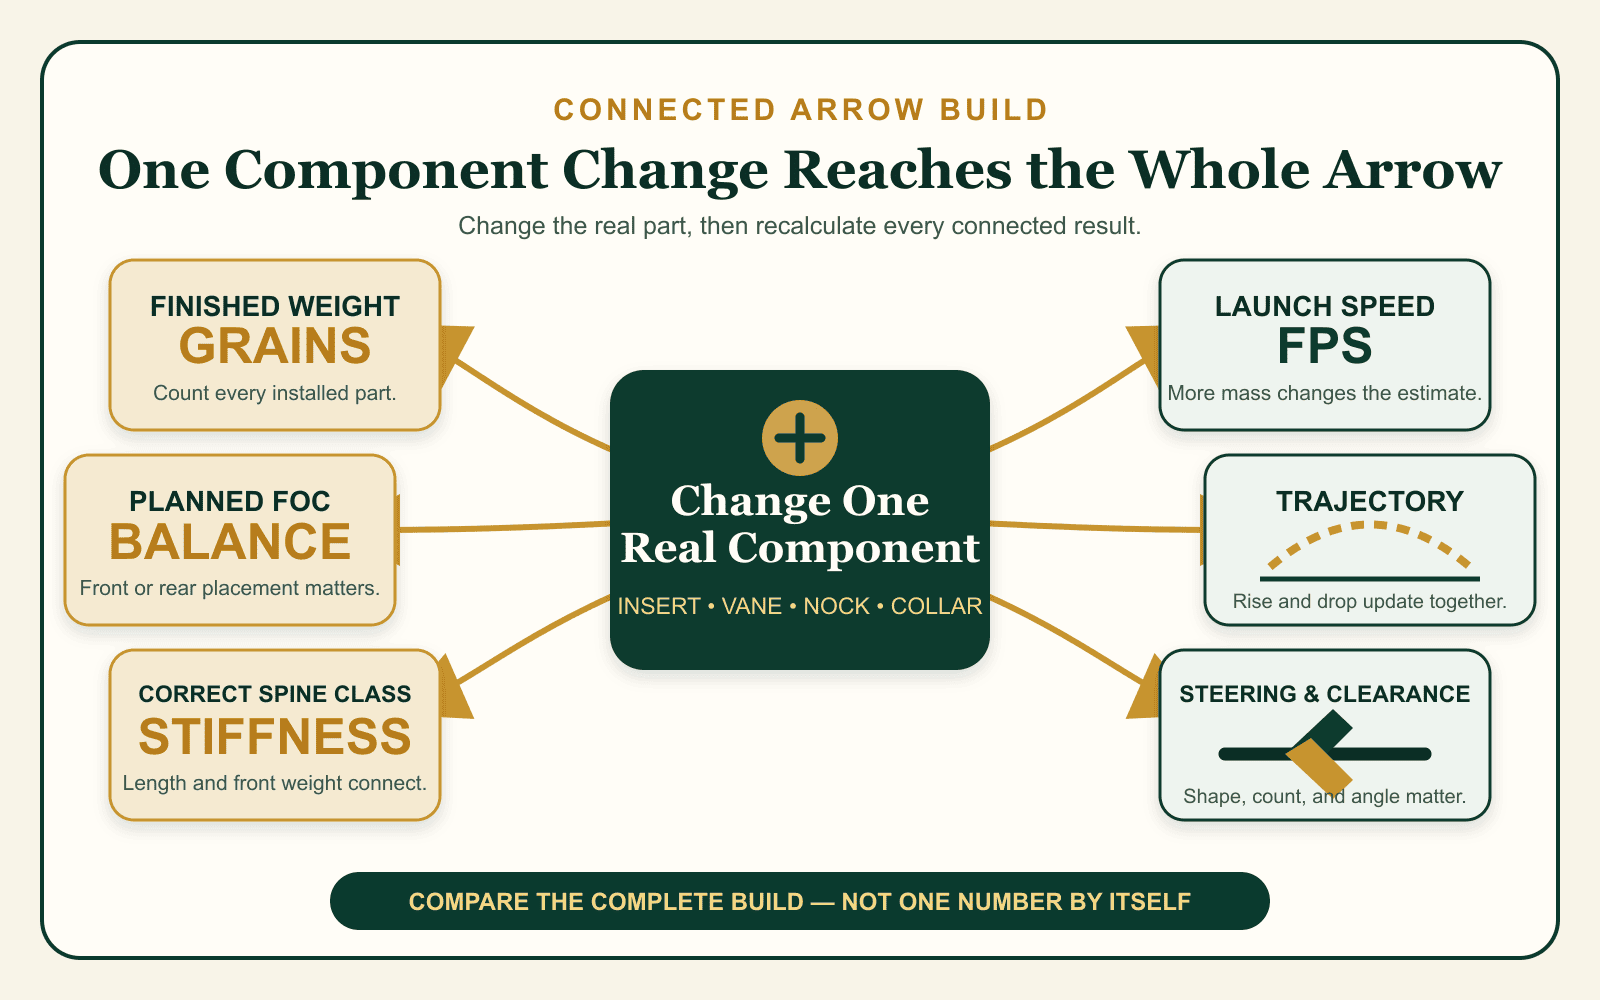
Every installed part does at least one job, and most parts affect more than one result. An insert may connect the broadhead, protect the shaft, add front weight, change FOC, and make the shaft act weaker during the shot. A vane may steer the broadhead, add rear weight, change drag, and create a clearance problem if the setup is wrong.
That is why I use three filters for every component decision:
- Compatibility: Does the exact part fit the exact shaft size and the rest of the assembly?
- Weight: What does the part add to prepared-shaft weight, finished-arrow weight, FOC, and Dynamic Spine?
- Flight: What does the choice change about steering, drag, clearance, noise, trajectory, and tuning?
A component can pass one filter and fail another. A heavy insert may fit the shaft and help reach total weight, but it can also push FOC higher and make the arrow act weaker. A fourth vane may add useful steering and rear weight, but it also adds drag and another surface that must clear the rest and cables.
The goal is not to collect good parts. The goal is to build one complete arrow that fits the mission.
Start With the Decisions Already Made
Do not shop for components before the main limits are known. Start with the bow, the hunt, and a safe arrow length.
You should already have a working answer for:
- actual peak draw weight
- actual draw length
- published IBO or ATA speed
- safe planned arrow length and prepared-shaft cut length
- normal hunting distance and maximum shot distance
- bow maker’s minimum finished-arrow weight
- working target arrow weight
- broadhead style and point weight; and
- the current Correct Spine Class shown by the Planner or the shaft maker’s chart.
If arrow length is still uncertain, start with How Long Should My Arrows Be?. Shaft length affects shaft weight, FOC, and how stiff the arrow acts during the shot. It belongs near the beginning of the process, not after the components are purchased.
These decisions are starting facts, not handcuffs. You can compare another target weight, point weight, or component path. The important part is changing one known input and letting the connected results update with it.
Compatibility Comes First
Compatibility means more than matching a diameter printed in a product name. The exact shaft spine can change inside and outside diameter, and the matching collar, half-out, outsert, bushing, or nock size can change with it.
Check the complete fit path:
- shaft model, spine, and exact inside or outside diameter
- insert, half-out, outsert, or HIT system
- collar size and whether the collar is required
- broadhead thread and shoulder fit
- optional internal or screw-in weight and the part it requires
- nock and, when used, nock bushing or collar
- vane count, vane clearance, and fletching application; and
- every combination the manufacturer or reviewed catalog marks as incompatible.
Some parts replace one another. A half-out does not get stacked on top of a HIT-and-collar system just because both parts fit the same shaft family. A screw-in weight is not a free-floating option; it must be used with the compatible threaded component it was built for.
Compatibility can also change the direction of the build. If the part you wanted is not verified for that shaft size, look for another reviewed component path or compare a different shaft. Do not force an unverified part into the math simply because its weight would make the total look better.
That is not a failed plan. It is the system protecting you from buying a collection of parts that do not belong together.
Count the Weight of Every Installed Part
Finished-arrow weight is the sum of the complete installed arrow. The shaft is only one part of it.
Count:
- the prepared shaft at its actual cut length
- broadhead or field point
- insert, half-out, outsert, or adapter
- collar or footer
- any compatible internal or screw-in weights
- nock
- nock bushing or rear collar
- vanes or feathers
- arrow wrap
- lighted-nock parts, when used; and
- glue, epoxy, and other measurable installed material when precision matters.
A difference of five or ten grains may be small by itself. Several forgotten parts can create a large error between the planned arrow and the arrow on the scale.
Use the Arrow Weight and Component Calculator when you want to study component weight in detail. Keep the same shaft length and part weights when you bring the decision back into the connected Planner.
How Components Change Arrow Flight
Component changes do not stay in one box. Moving weight to the front or rear changes the balance point. Adding weight can lower launch speed. A different vane setup can change steering and drag. A longer shaft or heavier front system can make the shaft act weaker.
The main connected effects are:
- Finished weight: the complete weight of the arrow ready to shoot.
- FOC: front of center, or how far the balance point sits ahead of the arrow’s midpoint.
- Dynamic Spine: how stiff the arrow acts as the bow launches it.
- Trajectory: the modeled rise and drop of the arrow through distance.
- Steering and drag: how the rear of the arrow controls rotation and broadhead flight while air resistance slows it.
- Clearance: whether the vanes, broadhead, shaft, and components pass the rest, riser, and cables without contact.
One number does not decide the build. A high FOC result does not automatically make an arrow better, and a flatter path does not excuse poor broadhead control. Use the numbers to compare the choices, then use one finished test arrow to check what the complete system actually does.
The Arrow FOC Calculator, Dynamic Spine Calculator, and Hunting Arrow Trajectory Calculator are useful when one decision needs deeper study. The connected Planner remains the best place to see how those decisions affect one another.
Choose the Shaft Before Finalizing the Components
Choose the shaft after the bow, length, target weight, and working spine class are known—but before the supporting components are finalized. This keeps the component search inside a real shaft size instead of a general product family.
Before you compare parts, use the 4mm, 5mm, and standard hunting-arrow diameter guide to separate the common inside-diameter family from the shaft’s actual outside diameter. A shared family label does not make every insert, nock, collar, half-out, or outsert interchangeable.
I will not use a shaft rated looser than ±.003 inch. I normally choose ±.001 inch. That is my consistency standard, not a promise that the arrow will tune or group by itself.
Straightness still has to work beside:
- the correct shaft class for the bow and front weight
- safe length and clearance
- square cuts and aligned components
- a broadhead that spins true
- correct nock fit
- vane clearance
- a clean tune; and
- accurate shooting.
Then look at grains per inch, diameter, stock length, component choices, durability needs, and the finished-weight room the shaft leaves. A lighter shaft can create more room for front components, rear weight, or speed. A heavier shaft can reach total weight with a simpler front system. Neither answer is automatically better.
Build the Complete Front System
The front system begins where the shaft supports the broadhead. Depending on the shaft, it may use a hidden insert, half-out, outsert, collar, adapter, or a combination specifically approved by the manufacturer.
Build it in this order:
- Confirm the exact component fits the shaft model and spine.
- Decide whether the front part replaces another part or requires it.
- Add the real installed weight of the insert, half-out, outsert, collar, adapter, and compatible added weights.
- Add the broadhead or field-point weight.
- Recalculate finished weight, FOC, Dynamic Spine, speed, and trajectory.
- Check broadhead shoulder fit, alignment, and shaft protection on the test arrow.
Front weight can help the build reach its target and move the balance point forward. It can also weaken the arrow dynamically and change trajectory. That is why “add more insert weight” is not a complete answer.
The compatible path matters as much as the number. If another verified front component reaches the target more cleanly, compare it. If the shaft still needs a pile of added weight and pushes the other results away from the mission, compare another shaft platform.
Build the Complete Rear System
The rear system includes the nock, any bushing or rear collar, the vanes or feathers, the wrap, and any lighted-nock parts. These are not leftover details.
Rear weight can lower Planned FOC and increase total weight without adding more leverage to the front of the shaft. It can also change launch speed and the finished balance point. The fletching shape, count, and application change steering, drag, noise, rotation, and clearance.
Record the rear as a real assembly:
- exact nock and weight
- nock bushing or collar and weight
- vane model and weight per vane
- three- or four-fletch count
- straight, offset, or helical application
- arrow wrap and weight; and
- lighted-nock parts, when used.
Do not use guessed rear weight to make the FOC number look better. Enter the parts you plan to install, then weigh the finished test arrow and measure its real balance point.
If you need to compare vane length, height, material, stiffness, weight, sound, and the tradeoff between control and drag, use the guide to compare hunting-arrow vane profiles and fletching tradeoffs before you finalize the count and application angle.
Choose Three or Four Fletches—and How They Are Applied
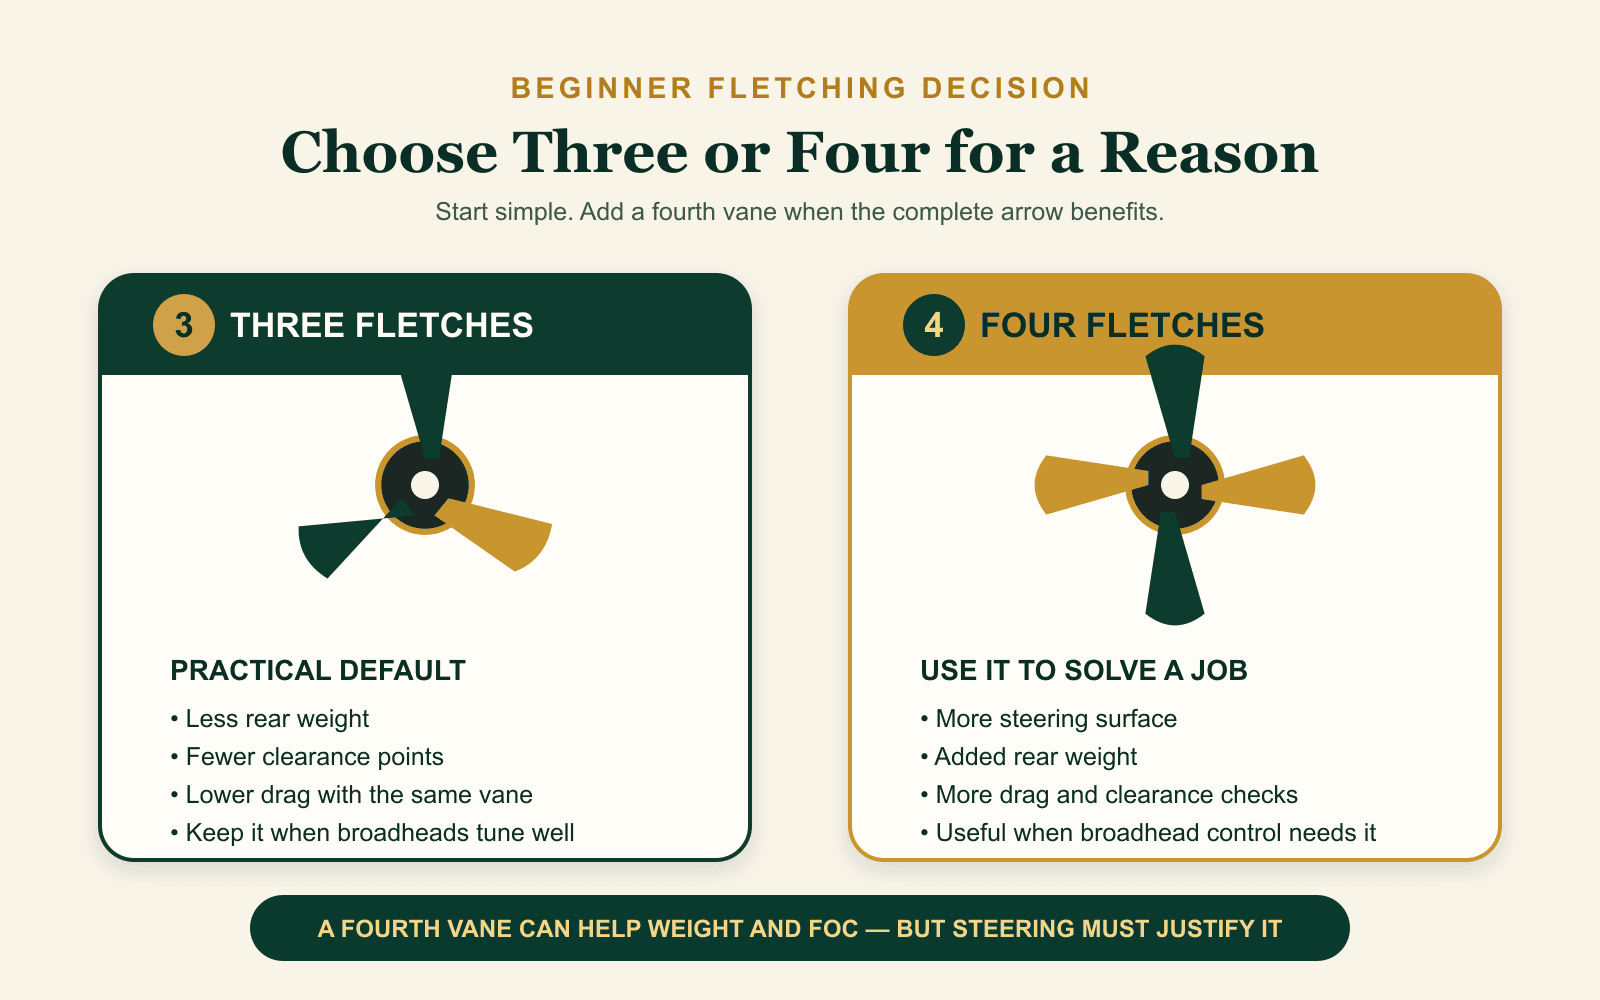
For a beginner, three vanes are the practical default. They use less rear weight, create fewer clearance points, and can provide enough control when the vane and application match the broadhead and bow.
Four vanes are a valid hunting setup when they solve a real need. They can add steering surface and rear weight, and the shorter spacing can help some broadhead-control and clearance plans. They also add drag, cost, and one more vane that must clear the rest and cables.
Use this decision list:
Start with three when:
- you want a simple, proven starting setup
- the fixed-blade or mechanical broadhead already tunes and groups well
- clearance is limited
- total rear weight and drag need to stay lower; or
- you do not yet have evidence that a fourth vane solves a problem.
Compare four when:
- a fixed-blade broadhead needs more steering after the bow and arrow are otherwise tuned
- the selected vane profile benefits from added surface area or a four-vane layout
- the complete setup has verified clearance
- the added rear weight helps a build that is light on total weight and heavy on Planned FOC; and
- you accept the connected speed and trajectory change.
How the vanes are applied matters too. Straight fletching has little intentional angle. Offset turns the vane slightly against the shaft and starts more rotation. Helical wraps the vane around the shaft more noticeably and normally creates more steering and drag. Use a sensible manufacturer or fletching-jig starting point, then verify clearance and broadhead flight.
The fourth vane should help control the arrow first. Its added rear weight can be useful, but it should not be installed only to force one FOC number.
A connected three-versus-four example
The planned Easton 5.0 example below is light on total weight and high on Planned FOC. Holding the shaft, 125-grain broadhead, front system, nock, bow inputs, length, and zero constant, a fourth 9-grain AAE Max Stealth vane changes the plan this way:
Three fletches
Total fletching weight: 27 gr
Planned finished weight: 466 gr
Difference from 490-grain target: 24 gr light
Planned FOC: 21.06%
Estimated launch speed: 246.1 fps
Estimated speed at 30 yards: 234.1 fps
Estimated drop at 30 yards: 4.2 in
Correct Spine Class: 340/350
Four fletches
Total fletching weight: 36 gr
Planned finished weight: 475 gr
Difference from 490-grain target: 15 gr light
Planned FOC: 19.95%
Estimated launch speed: 244.4 fps
Estimated speed at 30 yards: 232.0 fps
Estimated drop at 30 yards: 4.3 in
Correct Spine Class: 340/350
The fourth vane moves total weight and FOC in the desired direction, and it may add useful steering for the fixed-blade broadhead. It does not finish the job by itself. The build remains about 15 grains under the target and above the selected 13–18% FOC range, so another compatible component change or shaft comparison may still be the better plan.
My 2025 PSE Decree Reference Setup
The four examples below hold the same bow and hunting inputs steady. This lets you see what the shaft and compatible component system change without pretending this setup is correct for every hunter.
- 335 fps published IBO speed
- 60-pound actual peak draw weight
- 27.5-inch actual draw length
- 15 grains of bowstring accessories
- 30-yard normal hunting distance
- 60-yard maximum distance
- 490-grain custom target finished weight
- 28-inch prepared shaft
- 28.25-inch nock-throat-to-shaft-end planning length
- 125-grain fixed-blade broadhead profile
- 25-yard sight zero
- ±4-inch planning allowance
- three AAE Max Stealth vanes at 9 grains each and a 1-degree application angle
These are connected Planner estimates. They are not scale weights, measured balance points, chronograph readings, broadhead groups, or verified sight marks from finished test arrows.
Compare Four Reviewed Component Systems
Affiliate disclosure: Some product links below are affiliate links. I may earn a commission at no added cost to you. Technical fit, reviewed compatibility, and the connected results determined which examples appear—not the commission. Read my full affiliate disclosure.
These four profiles are not a first-to-fourth ranking. Each shows a different way compatible components, shaft weight, FOC, and flight can shape the mission.
Easton 5.0 Match Grade 340 — Lightweight Shaft With Adjustment Room
Role: A lightweight 5mm shaft platform that leaves room to choose where the finished weight is added.
Exact shaft: Easton 5.0 Match Grade, ±.001-inch straightness, 340 spine, 7.5 GPI. A 28-inch prepared shaft is planned at 210.0 grains.
Verified front path: 75-grain Easton 5mm brass HIT with a 21-grain Match Grade HIT Collar #1 and a 125-grain broadhead.
Rear system: 8-grain 5mm Microlite nock and three 9-grain AAE Max Stealth vanes.
Connected plan: 466.0 grains finished, 24.0 grains under the 490-grain target, 21.06% Planned FOC, an estimated 246.1 fps at launch, 234.1 fps at 30 yards, and about 4.2 inches of drop at 30 yards. The calculated spine target is 339.5. The selected 340 shaft is inside the 340/350 Correct Spine Class.
Main strength: The light shaft creates room to decide whether weight belongs in the front system, rear system, or another compatible part. That flexibility is useful when you want to study speed, steering, and balance instead of accepting one factory recipe.
Main limitation: This exact three-fletch path is light on total weight and above the selected 13–18% FOC target. The fourth-vane comparison improves both numbers but does not bring either one fully to the selected target.
Best fit: A hunter who wants a light 5mm starting shaft and is willing to use the Planner to compare complete compatible assemblies.
Skip it if: You want the shaft mass itself to carry more of the 490-grain target or you do not want to work through the front/rear balance.
Easton 5mm Axis Match Grade 340 — Heavier Shaft, Simpler Weight Path
Role: A heavier-GPI 5mm shaft that reaches closer to the target with a simpler front system.
Exact shaft: Easton 5mm Axis Match Grade, ±.001-inch straightness, 340 spine, 9.5 GPI. A 28-inch prepared shaft is planned at 266.0 grains.
Verified front path: 50-grain Easton 5mm brass HIT with a 125-grain broadhead.
Rear system: 9-grain X Nock and three 9-grain AAE Max Stealth vanes.
Connected plan: 477.0 grains finished, 13.0 grains under target, 15.80% Planned FOC, an estimated 244.0 fps at launch, 232.0 fps at 30 yards, and about 4.3 inches of drop at 30 yards. The calculated spine target is 363.5. The selected 340 shaft is inside the 340/350 Correct Spine Class.
Main strength: More of the finished weight comes from the shaft, so the example lands inside the selected FOC range without needing the heaviest front system.
Main limitation: It remains 13 grains below the selected target. Any added part still has to be compatible and placed with FOC, spine, and flight in mind.
Best fit: A hunter who wants an established 5mm platform, a moderate front system, and a planned FOC near the middle of the selected range.
Skip it if: You want the lightest shaft platform or need more room to place a large share of the weight in a specialized front assembly.
Victory RIP TKO Elite 350 — Balanced Small-Diameter System
Role: A .204-inch inside-diameter system that balances shaft mass with several spine-specific front-component choices.
Exact shaft: Victory RIP TKO Elite, ±.001-inch straightness, 350 spine, 8.7 GPI. A 28-inch prepared shaft is planned at 243.6 grains.
Verified front path: 75-grain medium TL half-out/outsert with a 125-grain broadhead. The medium size matters; similar-looking XXL parts are not verified for this 350-spine example.
Rear system: 9-grain AAE .204 nock and three 9-grain AAE Max Stealth vanes.
Connected plan: 479.6 grains finished, 10.4 grains under target, 18.20% Planned FOC, an estimated 243.5 fps at launch, 231.7 fps at 30 yards, and about 4.3 inches of drop at 30 yards. The calculated spine target is 351.5. The selected 350 shaft is inside the 340/350 Correct Spine Class.
Main strength: This is the closest of the four examples to the 490-grain target while keeping the shaft in the correct class and the front system on a reviewed spine-specific path.
Main limitation: The 18.20% Planned FOC is just above the selected 13–18% target. That is information to review, not an emergency and not a reason to round the result down.
Best fit: A hunter who wants a small-diameter ±.001 shaft and a balanced starting package near this target weight.
Skip it if: You need Planned FOC clearly below 18% without changing the rear system, front path, or shaft choice.
Black Eagle Rampage 350 — Compatible, Fast, and Too Light for This Target
Role: A light .204-inch shaft platform with more than one reviewed front-system direction.
Exact shaft: Black Eagle Rampage, ±.001-inch straightness, 350 spine, 8.2 GPI. A 28-inch prepared shaft is planned at 229.6 grains.
Verified front path: Approximate 58-grain Rampage FOCOS 2.0 system with a 125-grain broadhead. The FOCOS path replaces the included Bone Crusher half-out; the two are not stacked together.
Rear system: 7-grain R Nock, 3-grain Rampage nock collar, and three 9-grain AAE Max Stealth vanes.
Connected plan: 449.6 grains finished, 40.4 grains under target, 17.48% Planned FOC, an estimated 250.5 fps at launch, 237.7 fps at 30 yards, and about 4.1 inches of drop at 30 yards. The calculated spine target is 363.5. The selected 350 shaft is inside the 340/350 Correct Spine Class.
Main strength: The planned build is inside the selected FOC range and Correct Spine Class while producing the highest estimated speed of these four examples.
Main limitation: It is far below the 490-grain mission. Compatibility and a good FOC result do not make the finished weight close enough.
Best fit: A hunter whose mission supports a lighter finished arrow, or someone willing to compare another fully verified Rampage component path before accepting the build.
Skip it if: Reaching about 490 grains without forcing unverified or conditional parts is the priority. Another verified front path or a different shaft may be the cleaner answer.
Use Recommended or Custom Components in the Planner
The Everyday Arrow Planner supports two valid paths. Use the one that matches what you know.
Help Me Build My Arrow
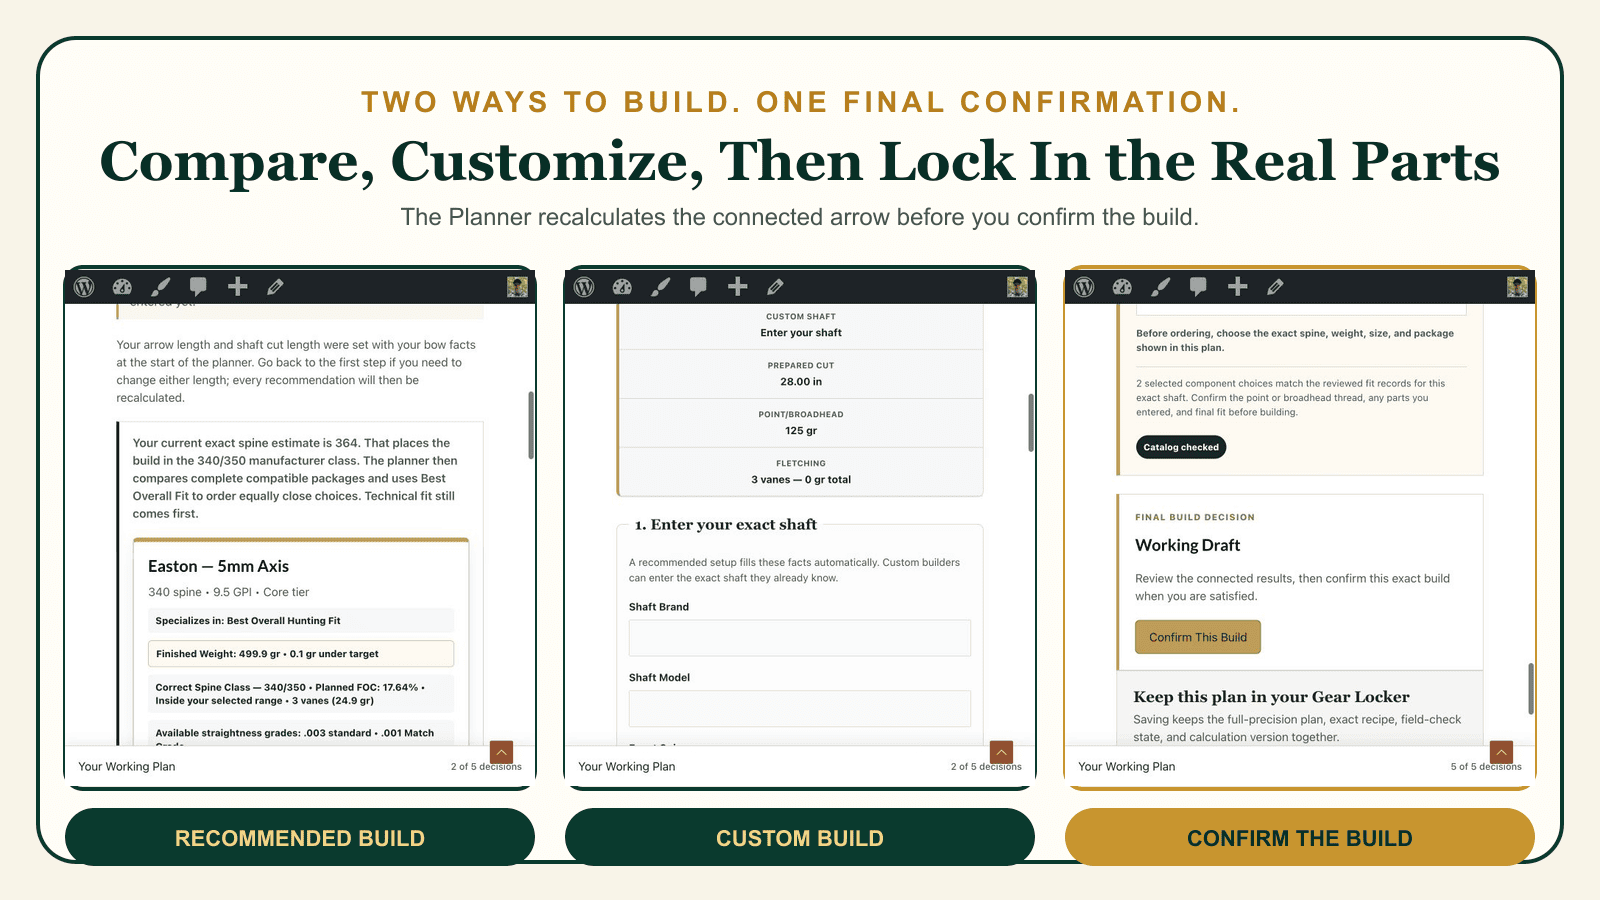
Use the recommended path when you want the Planner to compare reviewed shaft and component packages. The package cards show technical fit, planned finished weight versus the target, Planned FOC, Correct Spine Class, and the role of the complete build.
A recommendation is a starting package, not a command. Look at the limitation and the weight difference before applying it.
Build With My Own Components
Use the custom path when you already own the parts, want to model another verified assembly, or need to enter a component not offered in the reviewed package list. Enter the real shaft, GPI, spine, cut length, point, insert or outsert, collar, nock, vane, vane count, and other installed weights.
You can move between recommended and custom workspaces and change custom values at any time. A comparison shows what would change; it does not silently replace the working build. Apply the setup you want, then use Confirm This Build to establish the component plan carried into final review and saving.
The detailed recommended and custom component lesson walks through that interface step by step.
Build One Test Arrow
A planned result narrows the choices. One complete test arrow shows what the real parts and the real bow do together.
Before building the full batch:
- Confirm the exact shaft-to-component fit and required parts.
- Cut and square one shaft to the planned prepared length.
- Install the complete front and rear systems.
- Weigh the finished arrow on a grain scale.
- Measure the finished arrow length and balance point.
- Calculate the measured FOC.
- Check nock, vane, broadhead, rest, riser, and cable clearance.
- Paper tune or bare-shaft tune as appropriate for the setup.
- Broadhead tune and compare field-point impact.
- Chronograph the finished arrow when the equipment is available.
- Verify sight marks and real trajectory at safe, known distances.
- Correct the plan before building the rest of the batch.
The numbers are useful, but the test arrow decides whether the plan belongs on your bow.
Save and Continue the Arrow System
Save the confirmed plan in the Gear Locker. The saved build gives you a record of the shaft, components, calculated results, and final choices instead of asking you to rebuild the decision from memory next season.
After the test arrow is verified, update the record with the measured finished weight, balance point, FOC, speed when available, and any component change required during tuning. That turns the Gear Locker from a calculator history into a useful rebuild record.
The Arrow Planner is one part of the Everyday Arrow System. The system continues through building, tuning, broadhead verification, real trajectory, and hunting use.
VERIFY AND SAVE THE FINISHED BUILD
Your Next Steps
Your component plan is ready. Now build one test arrow, replace planning numbers with measured results, and save the setup you would trust in the field.
Compare Exact Parts in the Component Finder
Search reviewed shafts and compatible parts, then save a component system you can bring into the Arrow Planner.
Build the Exact Setup in the Arrow Planner
Keep the bow, length, distance, and component facts consistent.
Follow the Recommended and Custom Component Lesson
Compare a reviewed package or enter the real parts you already plan to use.
Plan and Verify FOC
Estimate the build before assembly, then measure the completed test arrow to confirm the real result.
Recheck Dynamic Spine
Use the actual length and complete front weight, then confirm the setup through tuning.
Save the Confirmed Plan in the Gear Locker
Keep the exact recipe, calculated results, measured facts, and field notes together for the next rebuild.
Return to the Everyday Arrow System
Continue from planning into building, tuning, broadhead verification, real trajectory, and hunting use.
Want to see exactly what I’m carrying this season? Check out my Personal Bowhunting Gear List for 2026